Overview
Kubernetes disaster-recovery is an essential feature in the production environment, and there are two things we want to backup for kubernetes:
- Kuberentes data: Kubernetes stores its state in etcd, so we can backup etcd for this purpose.
- Application data: i.e. volumes, we want to use velero for this purpose(this is what I want to talk about in this post).
Indeed, we can customize the backup method for each of applications, such as mysqldump for MySQL or MariaDB, bgsave for Redis and so on, and that what we actually did in the past. The advantage of this approach is that we can ignore the low-level storage details while the obvious drawback is that the workload for specifying backup methods continues to increase as the number of applications grows, which makes it hard to maintain and automate the backup.
To solve this problem, we need to find an uniform way to do bur(backup and restore) regardless of the type of application and Kubernetes Persistent Volume, and velero comes into our sight.
Velero Introduction
Velero (formerly Heptio Ark) gives you tools to back up and restore your Kubernetes cluster resources and persistent volumes. You can run Velero with a cloud provider or on-premises. Velero lets you:
- Take backups of your cluster and restore in case of loss.
- Migrate cluster resources to other clusters.
- Replicate your production cluster to development and testing clusters.
Velero consists of:
- A server that runs on your cluster
- A command-line client that runs locally
Each Velero operation – on-demand backup, scheduled backup, restore – is a custom resource, defined with a Kubernetes Custom Resource Definition (CRD) and stored in etcd. Velero also includes controllers that process the custom resources to perform backups, restores, and all related operations.
You can back up or restore all objects in your cluster, or you can filter objects by type, namespace, and/or label.
Velero is ideal for the disaster recovery use case, as well as for snapshotting your application state, prior to performing system operations on your cluster (e.g. upgrades).
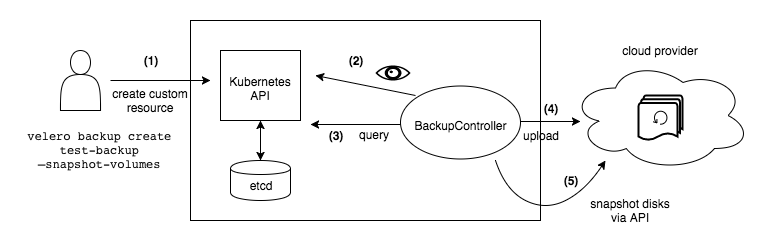
Velero Backup Workflow
When you run velero backup create test-backup:
- The Velero client makes a call to the Kubernetes API server to create a Backup object.
- The BackupController notices the new Backup object and performs validation.
- The BackupController begins the backup process. It collects the data to back up by querying the API server for resources.
- The BackupController makes a call to the object storage service – for example, AWS S3 – to upload the backup file.
By default, velero backup create makes disk snapshots of any persistent volumes. You can adjust the snapshots by specifying additional flags. Run velero backup create –help to see available flags. Snapshots can be disabled with the option –snapshot-volumes=false.
Methods to back up the contents of volumes
Refers to velero backup Kubernetes Persistent Volume failed with minio
for backing up the contents of volumes you have two options:
Use a volumesnapshotter plugin to take native snapshots of your volumes. This would work if you are running in AWS proper, and you have EBS volumes that you want to take snapshots of.
Use velero’s restic integration to take file-level backups of the contents of your volumes. You can use this to back up any type of volume (except hostPath).
Since some volume types may not have a native snapshot concept or there is no relevant snapshot plugin for the storage platform we are using yet, let’s switch to velero’s restic integration method.
How does velero backup and restore work with restic
Let’s introduce three custom resource definitions and associated controllers:
ResticRepository- represents/manages the lifecycle of Velero’s restic repositories. Velero creates a restic repository per namespace when the first restic backup for a namespace is requested. The controller for this custom resource executes restic repository lifecycle commands –restic init,restic check, andrestic prune.PodVolumeBackup- represents a restic backup of a volume in a pod. The main Velero backup process creates one or more of these when it finds an annotated pod. Each node in the cluster runs a controller for this resource (in a daemonset) that handles the PodVolumeBackups for pods on that node. The controller executesrestic backupcommands to backup pod volume data.PodVolumeRestore- represents a restic restore of a pod volume. The main Velero restore process creates one or more of these when it encounters a pod that has associated restic backups. Each node in the cluster runs a controller for this resource (in the same daemonset as above) that handles thePodVolumeRestoresfor pods on that node. The controller executesrestic restorecommands to restore pod volume data.
Backup
- The main Velero backup process checks each pod that it’s backing up for the annotation specifying a restic backup should be taken (
backup.velero.io/backup-volumes) - When found, Velero first ensures a restic repository exists for the pod’s namespace, by:
- checking if a
ResticRepositorycustom resource already exists - if not, creating a new one, and waiting for the
ResticRepositorycontroller to init/check it
- checking if a
- Velero then creates a
PodVolumeBackupcustom resource per volume listed in the pod annotation - The main Velero process now waits for the
PodVolumeBackupresources to complete or fail - Meanwhile, each
PodVolumeBackupis handled by the controller on the appropriate node, which:- has a hostPath volume mount of
/var/lib/kubelet/podsto access the pod volume data - finds the pod volume’s subdirectory within the above volume
- runs
restic backup - updates the status of the custom resource to
CompletedorFailed
- has a hostPath volume mount of
- As each
PodVolumeBackupfinishes, the main Velero process adds it to the Velero backup in a file named<backup-name>-podvolumebackups.json.gz. This file gets uploaded to object storage alongside the backup tarball. It will be used for restores, as seen in the next section.
Restore
- The main Velero restore process checks each existing
PodVolumeBackupcustom resource in the cluster to backup from. - For each
PodVolumeBackupfound, Velero first ensures a restic repository exists for the pod’s namespace, by:- checking if a
ResticRepositorycustom resource already exists - if not, creating a new one, and waiting for the
ResticRepositorycontroller to init/check it (note that in this case, the actual repository should already exist in object storage, so the Velero controller will simply check it for integrity)
- checking if a
- Velero adds an init container to the pod, whose job is to wait for all restic restores for the pod to complete (more on this shortly)
- Velero creates the pod, with the added init container, by submitting it to the Kubernetes API
- Velero creates a
PodVolumeRestorecustom resource for each volume to be restored in the pod - The main Velero process now waits for each
PodVolumeRestoreresource to complete or fail - Meanwhile, each
PodVolumeRestoreis handled by the controller on the appropriate node, which:- has a hostPath volume mount of
/var/lib/kubelet/podsto access the pod volume data - waits for the pod to be running the init container
- finds the pod volume’s subdirectory within the above volume
- runs
restic restore - on success, writes a file into the pod volume, in a .velero subdirectory, whose name is the UID of the Velero restore that this pod volume restore is for
- updates the status of the custom resource to
CompletedorFailed
- has a hostPath volume mount of
- The init container that was added to the pod is running a process that waits until it finds a file within each restored volume, under
.velero, whose name is the UID of the Velero restore being run - Once all such files are found, the init container’s process terminates successfully and the pod moves on to running other init containers/the main containers.
Kubernetes Persistent Volume BUR with Restic Integration(Minio Storage Provider)
# step1: Install velero+Minio
$ cat << EOF > credentials-velero
[default]
aws_access_key_id = minio
aws_secret_access_key = minio123
EOF
$ kubectl apply -f examples/minio/00-minio-deployment.yaml
namespace/velero created
deployment.apps/minio created
service/minio created
job.batch/minio-setup created

$ velero install \
      --provider aws \
      --plugins velero/velero-plugin-for-aws:v1.0.0 \
      --bucket velero \
      --secret-file ./credentials-velero \
      --use-restic \
      --backup-location-config region=minio,s3ForcePathStyle="true",s3Url=http://minio.velero.svc:9000 \
      --snapshot-location-config region=minio

[...truncate...]
Velero is installed! ⛵ Use 'kubectl logs deployment/velero -n velero' to view the status.

$ kubectl get pods -nvelero
NAME                     READY   STATUS      RESTARTS   AGE
minio-d787f4bf7-ljqz9    1/1     Running     0          36s
minio-setup-6ztpp        0/1     Completed   2          36s
restic-xstrc             1/1     Running     0          11s
velero-fd75fbd6c-2j2lb   1/1     Running     0          11s

# step2: Deploy nginx application(with-pv)
$ kubectl apply -f examples/nginx-app/with-pv.yaml
namespace/nginx-example created
persistentvolumeclaim/nginx-logs created
deployment.apps/nginx-deployment created
service/my-nginx created

$ kubectl get all -nnginx-example
NAME                                   READY   STATUS    RESTARTS   AGE
pod/nginx-deployment-7d46f5c9d-s6w6z   1/1     Running   0          17s

NAME               TYPE           CLUSTER-IP      EXTERNAL-IP   PORT(S)        AGE
service/my-nginx   LoadBalancer   194.70.176.92   <pending>     80:30955/TCP   17s

NAME                               READY   UP-TO-DATE   AVAILABLE   AGE
deployment.apps/nginx-deployment   1/1     1            1           17s

NAME                                         DESIRED   CURRENT   READY   AGE
replicaset.apps/nginx-deployment-7d46f5c9d   1         1         1       17s

$ curl 194.70.176.92
...
<title>Welcome to nginx!</title>
...

$ kubectl exec nginx-deployment-7d46f5c9d-s6w6z -nnginx-example -- cat /var/log/nginx/access.log
194.70.0.1 - - [20/Mar/2020:01:37:17 +0000] "GET / HTTP/1.1" 200 612 "-" "curl/7.29.0" "-"
194.70.0.1 - - [20/Mar/2020:01:37:24 +0000] "GET / HTTP/1.1" 200 612 "-" "curl/7.29.0" "-"
194.70.0.1 - - [20/Mar/2020:01:37:25 +0000] "GET / HTTP/1.1" 200 612 "-" "curl/7.29.0" "-"
194.70.0.1 - - [20/Mar/2020:01:37:25 +0000] "GET / HTTP/1.1" 200 612 "-" "curl/7.29.0" "-"
194.70.0.1 - - [20/Mar/2020:01:37:25 +0000] "GET / HTTP/1.1" 200 612 "-" "curl/7.29.0" "-"
194.70.0.1 - - [20/Mar/2020:01:37:25 +0000] "GET / HTTP/1.1" 200 612 "-" "curl/7.29.0" "-"
194.70.0.1 - - [20/Mar/2020:01:37:26 +0000] "GET / HTTP/1.1" 200 612 "-" "curl/7.29.0" "-"
194.70.0.1 - - [20/Mar/2020:01:37:26 +0000] "GET / HTTP/1.1" 200 612 "-" "curl/7.29.0" "-"
194.70.0.1 - - [20/Mar/2020:01:37:26 +0000] "GET / HTTP/1.1" 200 612 "-" "curl/7.29.0" "-"
194.70.0.1 - - [20/Mar/2020:01:37:26 +0000] "GET / HTTP/1.1" 200 612 "-" "curl/7.29.0" "-"

# step3: Annotate the nginx-example
$ kubectl -n nginx-example annotate pod/nginx-deployment-7d46f5c9d-s6w6z backup.velero.io/backup-volumes=nginx-logs

# step4: Create a backup with PV snapshotting
$ velero backup create nginx-backup-with-pv --include-namespaces nginx-example
Backup request "nginx-backup-with-pv" submitted successfully.

$ velero backup get
NAME                   STATUS      CREATED                         EXPIRES   STORAGE LOCATION   SELECTOR
nginx-backup-with-pv   Completed   2020-03-20 09:46:36 +0800 CST   29d       default            <none>

# step5: Simulate a disaster
$ kubectl delete namespace nginx-example
namespace "nginx-example" deleted

# step6: Restore
$ velero restore create --from-backup nginx-backup-with-pv
Restore request "nginx-backup-with-pv-20200320094935" submitted successfully.

$ velero restore get
NAME                                  BACKUP                 STATUS      WARNINGS   ERRORS   CREATED                         SELECTOR
nginx-backup-with-pv-20200320094935   nginx-backup-with-pv   Completed   0          0        2020-03-20 09:49:35 +0800 CST   <none>

# step7: Check application
$ kubectl get all -nnginx-example
NAME                                   READY   STATUS    RESTARTS   AGE
pod/nginx-deployment-7d46f5c9d-s6w6z   1/1     Running   0          57s

NAME               TYPE           CLUSTER-IP       EXTERNAL-IP   PORT(S)        AGE
service/my-nginx   LoadBalancer   194.70.176.93  <pending>     80:30216/TCP   57s

NAME                               READY   UP-TO-DATE   AVAILABLE   AGE
deployment.apps/nginx-deployment   1/1     1            1           57s

NAME                                         DESIRED   CURRENT   READY   AGE
replicaset.apps/nginx-deployment-7d46f5c9d   1         1         1       57s

# step8: Check Persistent Volume
# same with access log before restore(that's what we want)
$ kubectl exec nginx-deployment-7d46f5c9d-s6w6z -nnginx-example -- cat /var/log/nginx/access.log
194.70.0.1 - - [20/Mar/2020:01:37:17 +0000] "GET / HTTP/1.1" 200 612 "-" "curl/7.29.0" "-"
194.70.0.1 - - [20/Mar/2020:01:37:24 +0000] "GET / HTTP/1.1" 200 612 "-" "curl/7.29.0" "-"
194.70.0.1 - - [20/Mar/2020:01:37:25 +0000] "GET / HTTP/1.1" 200 612 "-" "curl/7.29.0" "-"
194.70.0.1 - - [20/Mar/2020:01:37:25 +0000] "GET / HTTP/1.1" 200 612 "-" "curl/7.29.0" "-"
194.70.0.1 - - [20/Mar/2020:01:37:25 +0000] "GET / HTTP/1.1" 200 612 "-" "curl/7.29.0" "-"
194.70.0.1 - - [20/Mar/2020:01:37:25 +0000] "GET / HTTP/1.1" 200 612 "-" "curl/7.29.0" "-"
194.70.0.1 - - [20/Mar/2020:01:37:26 +0000] "GET / HTTP/1.1" 200 612 "-" "curl/7.29.0" "-"
194.70.0.1 - - [20/Mar/2020:01:37:26 +0000] "GET / HTTP/1.1" 200 612 "-" "curl/7.29.0" "-"
194.70.0.1 - - [20/Mar/2020:01:37:26 +0000] "GET / HTTP/1.1" 200 612 "-" "curl/7.29.0" "-"
194.70.0.1 - - [20/Mar/2020:01:37:26 +0000] "GET / HTTP/1.1" 200 612 "-" "curl/7.29.0" "-"
Kubernetes cluster BUR Process with Restic Integration
We can backup Kubernetes cluster regularly and restore it when disaster happens as below:
- Add annotations for pods with persistent volumes by hand
- Create velero backup(including pods and relevant volumes) for the cluster
- Delete the whole Kubernetes cluster(simulate a disaster)
- Install a new Kubernetes Cluster and velero with the same storage provider as before
- Wait velero backup to appear in the new Kubernetes cluster
- Do velero restore
- Check the new Kubernetes cluster state(Kuberentes data&&Application data) - whether or not the same state as before
Some thought about velero with Restic Integration
- Incremental backup
An incremental backup chain will be maintained across pod reschedules for PVCs. However, for pod volumes that are not PVCs, such as emptyDir volumes, when a pod is deleted/recreated (e.g. by a ReplicaSet/Deployment), the next backup of those volumes will be full rather than incremental, because the pod volume’s lifecycle is assumed to be defined by its pod.
- Application influence during backup
There is no influence since the application is completely unaware of the restic backup, but the possibility of inconsistency of data always exists.
- Performance
Restic scans each file in a single thread. This means that large files (such as ones storing a database) will take a long time to scan for data deduplication, even if the actual difference is small.
Advanced research for velero with Restic Integration
Multiple Pods with velero restic backup annotation backend with same PersistentVolumeClaims
velero restic will backup the PersistentVolumeClaims only once when there are multiple backup annotations backend with the same PersistentVolumeClaims as below:
$ kubectl create ns multi
$ kubectl apply -f examples/nginx-app/with-pv.yaml -nmulti
$ kubectl get pods -nmulti
NAME                               READY   STATUS    RESTARTS   AGE
nginx-deployment-7d46f5c9d-r84xs   1/1     Running   0          177m
nginx-deployment-7d46f5c9d-trk4b   1/1     Running   0          177m
$ kubectl -n multi annotate pods/nginx-deployment-7d46f5c9d-r84xs backup.velero.io/backup-volumes=nginx-logs
pod/nginx-deployment-7d46f5c9d-r84xs annotated
$ kubectl -n multi annotate pods/nginx-deployment-7d46f5c9d-trk4b backup.velero.io/backup-volumes=nginx-logs
pod/nginx-deployment-7d46f5c9d-trk4b annotated
$ velero backup create multi-test --include-namespaces multi
# there is only one restic backup record
$ velero backup describe multi-test --details
Name:         multi-test
Namespace:    velero
Labels:       velero.io/storage-location=default
Annotations:  <none>

Phase:  Completed

Started:    2020-04-08 14:35:15 +0800 CST
Completed:  2020-04-08 14:35:35 +0800 CST

Expiration:  2020-05-08 14:35:15 +0800 CST

Resource List:
[...truncate...]
  v1/PersistentVolume:
    - pvc-f5705747-d922-4ece-86e2-3b3bf3156e81
  v1/PersistentVolumeClaim:
    - multi/nginx-logs
  v1/Pod:
    - multi/nginx-deployment-7d46f5c9d-r84xs
    - multi/nginx-deployment-7d46f5c9d-trk4b
[...truncate...]
Persistent Volumes: <none included>

Restic Backups:
  Completed:
    multi/nginx-deployment-7d46f5c9d-r84xs: nginx-logs

$ velero backup logs multi-test
time="2020-04-08T06:35:28Z" level=info msg="Backing up item" backup=velero/multi-test group=v1 logSource="pkg/backup/item_backupper.go:169" name=pvc-f5705747-d922-4ece-86e2-3b3bf3156e81 namespace= resource=persistentvolumes
time="2020-04-08T06:35:28Z" level=info msg="Executing takePVSnapshot" backup=velero/multi-test group=v1 logSource="pkg/backup/item_backupper.go:400" name=pvc-f5705747-d922-4ece-86e2-3b3bf3156e81 namespace= resource=persistentvolumes
time="2020-04-08T06:35:28Z" level=info msg="Skipping snapshot of persistent volume because volume is being backed up with restic." backup=velero/multi-test group=v1 logSource="pkg/backup/item_backupper.go:418" name=pvc-f5705747-d922-4ece-86e2-3b3bf3156e81 namespace= persistentVolume=pvc-f5705747-d922-4ece-86e2-3b3bf3156e81 resource=persistentvolumes
time="2020-04-08T06:35:34Z" level=info msg="Backing up item" backup=velero/multi-test group=v1 logSource="pkg/backup/item_backupper.go:169" name=nginx-deployment-7d46f5c9d-trk4b namespace=multi resource=pods
time="2020-04-08T06:35:34Z" level=info msg="Pod volume uses a persistent volume claim which has already been backed up with restic from another pod, skipping." backup=velero/multi-test group=v1 logSource="pkg/backup/item_backupper.go:198" name=nginx-deployment-7d46f5c9d-trk4b namespace=multi podVolume=nginx-logs pvcName=nginx-logs resource=pods
velero-volume-controller
Since one drawback of velero with Restic Integration is that we have to add relevant annotation for pods with persistent volumes by hand for backing up application data and meanwhile the velero official hasn’t provided a solution to backup all volume resources in the cluster yet.
To solve this, I have created a repo called velero-volume-controller, which helps users to do this dull job automatically as below:
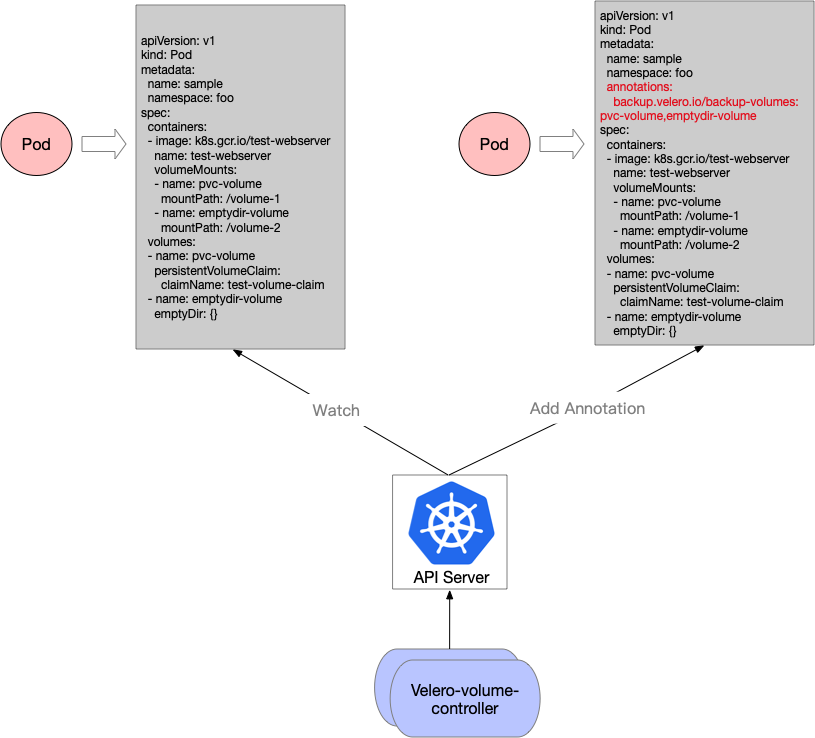
Create regularly scheduled backups based on a cron expression
Let’s do a simple test for regularly scheduled backups:
$ velero schedule create backup-tutorial --schedule="*/2 * * * *"
$ velero schedule get
NAME              STATUS    CREATED                         SCHEDULE      BACKUP TTL   LAST BACKUP   SELECTOR
backup-tutorial   Enabled   2020-03-25 14:18:34 +0800 CST   */2 * * * *   720h0m0s     8s ago        <none>
$ velero backup get
NAME                             STATUS      CREATED                         EXPIRES   STORAGE LOCATION   SELECTOR
backup-tutorial-20200325062029   Completed   2020-03-25 14:20:29 +0800 CST   29d       default            <none>
backup-tutorial-20200325061834   Completed   2020-03-25 14:18:34 +0800 CST   29d       default            <none>
Switch between underlying storage providers
$ kubectl get sc
NAME            PROVISIONER       AGE
storage-provider1          provisioner/storage-provider1   5h7m
storage-provider2 (default)   provisioner/storage-provider2     23m
# create nginx with persistent volume based on storage-provider1
# delete storage-provider1 and rename storage-provider2 to storage-provider1
$ kubectl get sc
NAME            PROVISIONER       AGE
storage-provider1          provisioner/storage-provider2   25m
$ kubectl delete ns nginx-example
# restore(from storage-provider1 to storage-provider2 persistent volume)
$ velero restore create --from-backup bur-backup --include-namespaces nginx-example
$ velero restore get
NAME                        BACKUP       STATUS      WARNINGS   ERRORS   CREATED                         SELECTOR
bur-backup-20200325170537   bur-backup   Completed   0          0        2020-03-25 17:05:37 +0800 CST   <none>
# check nginx-example state - ok
As you can can, the requirements for switching between underlying storage providers list below:
- Same StorageClassName
- Support relevant access modes of persistent volume(i.e. RWO, ROX and RWX)
Backup Big Data
When backing up big data, such as 100G or more, velero backup will fail as below:
$ dd if=/dev/urandom of=test100g bs=1M count=102400
$ kubectl cp test100g test/nginx-deployment-7f6f89ddbf-lq245:/var/log/nginx/
$ kubectl -n test annotate pods/nginx-deployment-7f6f89ddbf-4bxrn backup.velero.io/backup-volumes=nginx-logs
$ velero backup create big-data-test --include-namespaces test
# PartiallyFailed
$ velero backup get
big-data-test                   PartiallyFailed (1 error)   2020-03-26 15:54:00 +0800 CST   25d       default            <none>
$ velero backup describe big-data-test
Name:         big-data-test100g-again
Namespace:    velero
Labels:       velero.io/storage-location=default
Annotations:  <none>

Phase:  PartiallyFailed (run `velero backup logs big-data-test` for more information)

Errors:    1
Warnings:  0

Started:    2020-03-26 15:54:00 +0800 CST
Completed:  2020-03-26 16:54:15 +0800 CST

Expiration:  2020-04-25 15:54:00 +0800 CST

Persistent Volumes: <none included>

Restic Backups (specify --details for more information):
  Completed:  1

# podvolumebackups end with normal 'Completion' Phase
$ kubectl describe podvolumebackups/big-data-test-t5r76 -nvelero
[...truncate...]
Status:
  Completion Timestamp:  2020-03-26T09:20:40Z
  Phase:                 Completed
  Progress:
    Bytes Done:     107607179459
    Total Bytes:    107607179459
  Snapshot ID:      b19cf1c8
  Start Timestamp:  2020-03-26T07:54:14Z
Events:             <none>
The default value of restic_timeout is one hour, we can increase this for large migrations, keeping in mind that a higher value may delay the return of error messages.
# increase the timeout value -- under the args section of the velero deployment as below:
[...truncate...]
    spec:
      containers:
      - args:
        - server
        - --restic-timeout=3h
        command:
        - /velero
Now restic backup successfully as below:
$ velero backup get
big-data-test100g                   Completed                   2020-03-30 20:12:39 +0800 CST   29d       default            <none>
$ velero backup describe big-data-test100g
Name:         big-data-test100g
Namespace:    velero

Started:    2020-03-30 20:12:39 +0800 CST
Completed:  2020-03-30 21:40:26 +0800 CST

Expiration:  2020-04-29 20:12:39 +0800 CST

Persistent Volumes: <none included>

Restic Backups (specify --details for more information):
  Completed:  1

$ kubectl describe podvolumebackups/big-data-test100g-wsnvv -nvelero
[...truncate...]
Status:
  Completion Timestamp:  2020-03-30T13:40:25Z
  Phase:                 Completed
  Progress:
    Bytes Done:     107374182400
    Total Bytes:    107374182400
  Snapshot ID:      248d592e
  Start Timestamp:  2020-03-30T12:12:56Z
Events:             <none>
Backup concurrently
Right now, velevo restic has not supported running restic backups concurrently as below:
$ velero backup describe multiple-test --details
[...truncate...]
Started:    2020-04-02 16:02:28 +0800 CST
Completed:  <n/a>

Expiration:  2020-05-02 16:02:28 +0800 CST

Resource List:  <backup resource list not found>

Persistent Volumes: <none included>

Restic Backups:
  Completed:
    test-1/nginx-deployment-7f6f89ddbf-rfm7f: nginx-logs
    test-10/nginx-deployment-7f6f89ddbf-t7dg4: nginx-logs
  In Progress:
    test-100/nginx-deployment-7f6f89ddbf-qjhvt: nginx-logs (85.55%)
And you can get more information about this here.
High-availability
Currently, Velero does not support multiple replicas of the server.
We’re looking at ways to address making it more concurrent and highly available, including a design for worker pods, making one pod or job per backup/restore.
That does still leave challenges for the server loops that handle dispatching the Backup and Restores to the workers, though. Some ideas for addressing that are discussed in #487.
Incremental backup
# test1 - single big file(100G)
# loop-1 - 42m
$ dd if=/dev/urandom of=test100G bs=1M count=102400
# loop-2 - 37m
$ echo "hello world" >> test100G
# loop-3 (unchanged) - 17s
# loop-4 - 42s
$ dd if=/dev/urandom of=test1G bs=1M count=1024
# test1 shows that the restic backup is incremental but time token to scan for data deduplication increases as file size grows

# test2 - multiple files within one persistent volume(10W-1M files)
# loop-1 - 10m
# loop-2(+1M) - 17s
$ dd if=/dev/urandom of=test1M bs=1M count=1
# loop-3(+1G) - 17s
$ dd if=/dev/urandom of=test1G bs=1M count=1024
# loop-4(delete serveral files) - 18s
# loop-5(delete all files) - 3s
# attention: backup data in object storage provider still remains

# test3 - pod restart(17s)
# test3 shows that an incremental backup chain will be maintained across pod reschedules for PVCs.
Delete policy
velero restic backup delete will remove relevant backup, restore and disk snapshots,but it won’t delete restic data or affect other backups
$ velero backup create delete-policy-2 --include-namespaces test4
$ velero backup create delete-policy-3 --include-namespaces test4
194.70.0.1 - - [07/Apr/2020:11:39:36 +0000] "GET / HTTP/1.1" 200 612 "-" "curl/7.29.0" "-"
$ velero backup delete delete-policy-2
Request to delete backup "delete-policy-2" submitted successfully.
The backup will be fully deleted after all associated data (disk snapshots, backup files, restores) are removed.
$ kubectl delete ns test4
$ velero restore create --from-backup delete-policy-3
194.70.0.1 - - [07/Apr/2020:11:39:36 +0000] "GET / HTTP/1.1" 200 612 "-" "curl/7.29.0" "-"
CSI Persistent Volume Support
Let’s do a simple test with csi-driver-nfs as below:
# step1: deploy nfs server
$ docker run -d --net=bridge --privileged --name nfs-server mnagy/nfs-server /exports/foo
$ mount <CONTAINER_IP>:/exports/foo /mnt/foo
# step2: deploy csi-driver-nfs
$ git clone https://github.com/kubernetes-csi/csi-driver-nfs.git
$ cd csi-driver-nfs && kubectl -f deploy/kubernetes create
# step3: create nginx pod with nfs volume
# Refers to https://github.com/kubernetes-csi/csi-driver-nfs/blob/master/examples/kubernetes/nginx.yaml
$ kubectl -n nfs -f examples/kubernetes/nginx.yaml create
# step4: annotation
$ kubectl -n nfs annotate pods/nginx backup.velero.io/backup-volumes=data-nfsplugin
# step5: add file to volume
$ echo "hello world" > /mnt/foo/testfile
# step6: create velero backup
$ velero backup create nfs-csi-test --include-namespaces nfs
$ velero backup describe nfs-csi-test --details
Name:         nfs-csi-test
Namespace:    velero
Labels:       velero.io/storage-location=default
Annotations:  <none>

Phase:  Completed

Namespaces:
  Included:  nfs
  Excluded:  <none>

  v1/Namespace:
    - nfs
  v1/PersistentVolume:
    - data-nfsplugin
  v1/PersistentVolumeClaim:
    - nfs/data-nfsplugin
  v1/Pod:
    - nfs/nginx

Persistent Volumes: <none included>

Restic Backups:
  Completed:
    nfs/nginx: data-nfsplugin

# step7: delete ns nfs
$ kubectl delete ns nfs
# step8: create velero restore
$ velero restore create --from-backup nfs-csi-test
$ velero restore describe nfs-csi-test-20200409123021 --details
Name:         nfs-csi-test-20200409123021
Namespace:    velero
Labels:       <none>
Annotations:  <none>

Phase:  Completed

Backup:  nfs-csi-test

Namespace mappings:  <none>

Restic Restores:
  Completed:
    nfs/nginx: data-nfsplugin

$ tree /var/lib/kubelet/pods/55dcb0a2-b64d-4fba-8911-7ca004f6834b/volumes/kubernetes.io~csi/data-nfsplugin/
/var/lib/kubelet/pods/55dcb0a2-b64d-4fba-8911-7ca004f6834b/volumes/kubernetes.io~csi/data-nfsplugin/
|-- mount
|   |-- .velero
|   |   `-- c671c64a-9a25-40e2-820d-fcdb585cfdfb
|   `-- testfile
`-- vol_data.json

2 directories, 3 files

# there is no mount subdirectory for cephfs persistent volume
$ tree /var/lib/kubelet/pods/e308b3da-9a7f-4ab6-857d-9698fe3729f7/volumes/kubernetes.io~cephfs/pvc-93698762-faf4-4a22-b329-3abd0b598065/
/var/lib/kubelet/pods/e308b3da-9a7f-4ab6-857d-9698fe3729f7/volumes/kubernetes.io~cephfs/pvc-93698762-faf4-4a22-b329-3abd0b598065/
|-- access.log
`-- error.log

0 directories, 2 files

$ cat /var/lib/kubelet/pods/55dcb0a2-b64d-4fba-8911-7ca004f6834b/volumes/kubernetes.io~csi/data-nfsplugin/mount/.velero/c671c64a-9a25-40e2-820d-fcdb585cfdfb
[...empty...]

# step9: check application data - ok
$ cat /var/lib/kubelet/pods/55dcb0a2-b64d-4fba-8911-7ca004f6834b/volumes/kubernetes.io~csi/data-nfsplugin/mount/testfile
hello world
Conclusion
This article is more like a practical guide than theory analysis, stays tuned as this evolves.
Refs
- Append “/mount” to directory for CSI volumes
- Add backup annotation
- Velero Community Meetings
- Restore using Restic
- backup velero erro restic
- velero-volume-controller
- RFE: option to delete & recreate objects that already exist when restoring
- design for data-only restores
- velero official Documentation
- PartiallyFailed on backup
- Backup and Restore of Kubernetes Applications using Heptio’s Velero with Restic and Rook-Ceph as the storage provider
- velero backup Kubernetes Persistent Volume failed with minio
- velero Cluster migration
- Restic Integration
- Backup and Restore PVCs using Velero with restic and OpenEBS from Baremetal cluster to AWS
- Ability to specify other S3-compatible storage for VolumeSnapshotLocation
- Create a backup and restore from it