前言
Kong is a cloud-native, fast, scalable, and distributed Microservice Abstraction Layer (also known as an API Gateway or API Middleware). Made available as an open-source project in 2015, its core values are high performance and extensibility.
Actively maintained, Kong is widely used in production at companies ranging from startups to Global 5000 as well as government organizations.
Kong是目前社区最流行的云原生API网关。高性能和可扩展两大特性使得Kong被各大厂商广泛使用
在深入Kong使用前有必要对Kong的作用进行概述:
If you are building for the web, mobile, or IoT (Internet of Things) you will likely end up needing common functionality to run your actual software. Kong can help by acting as a gateway (or a sidecar) for microservices requests while providing load balancing, logging, authentication, rate-limiting, transformations, and more through plugins.
也即在进行微服务开发时,我们需要一些公共的特性和功能,例如:日志、负载均衡、认证以及Rate limiting等。而Kong(API网关)便充当着这个角色,使服务与这些公共功能解耦,让开发者更加专注于自身的服务开发和运维,从这些繁琐的外围事情中解脱出来。更直观的对比如下:
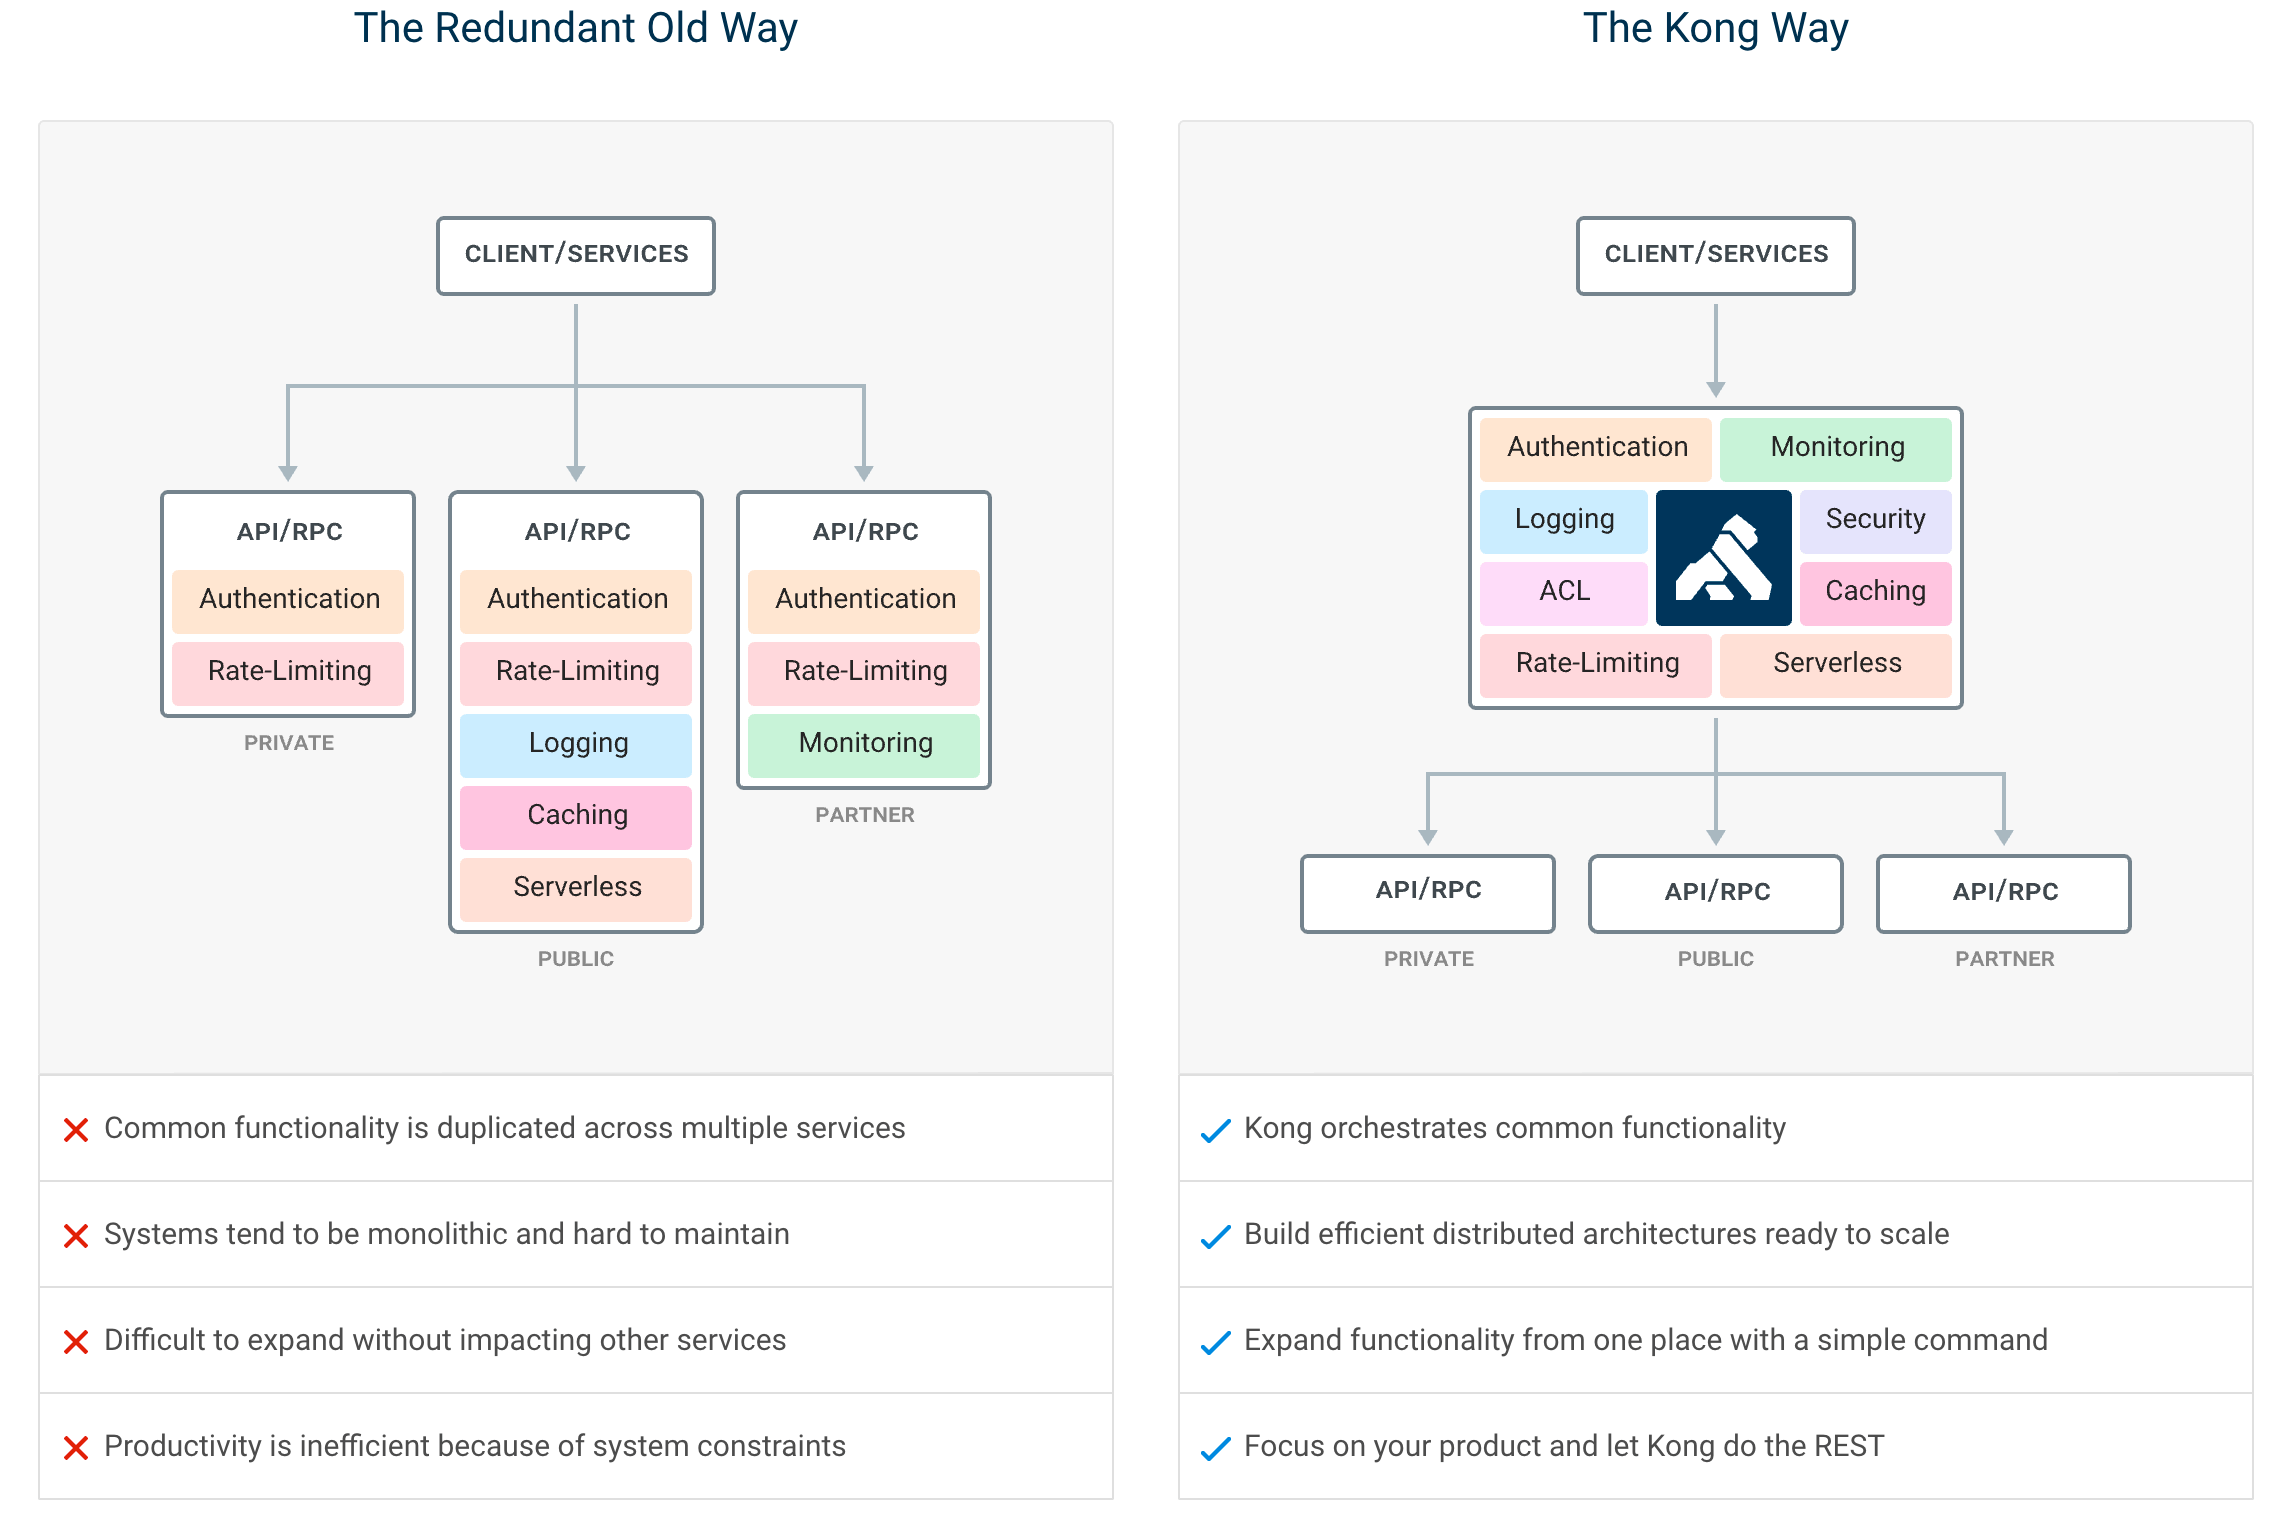
在旧的服务管理体制下,各个服务需要各自开发具有相同功能的诸如日志、认证以及Rate limiting等模块,不仅增加了开发者负担也增加了整个系统的冗余度;而对比Kong(API网关)作为这些公共服务的统一接入层,所有外围服务均由Kong实现,整个系统结构清晰且易维护
Kong
这里我们从Kong Admin API为切入点深入Kong的使用
一、Kong Admin API
By default Kong listens on the following ports:
:8000on which Kong listens for incoming HTTP traffic from your clients, and forwards it to your upstream services.:8443on which Kong listens for incoming HTTPS traffic. This port has a similar behavior as the :8000 port, except that it expects HTTPS traffic only. This port can be disabled via the configuration file.:8001on which the Admin API used to configure Kong listens.:8444on which the Admin API listens for HTTPS traffic.
如图:
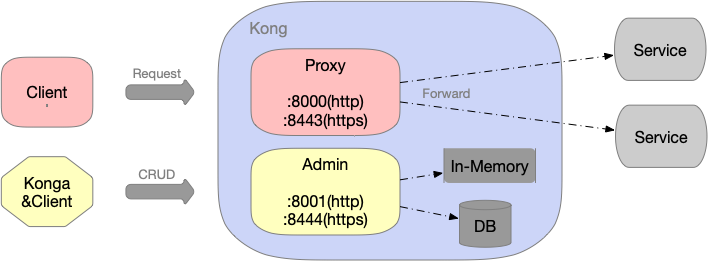
- 1、Proxy端口(
8000or8443)用于代理后端服务 - 2、Admin端口(
8001or8444)用于管理Kong配置,对Kong配置进行CRUD操作(Konga就是利用Admin API实现的GUI)
二、Kong Configuration Mode
在详细介绍Kong具体使用之前,我们先介绍一下Kong的两种使用模式:
- DB-less mode:使用declarative configuration,所有配置存放于一个配置文件中(YAML or JSON格式),不需要使用数据库,而修改配置的方法有两种:
- 1、静态——在kong初始化时指定
declarative_config文件路径:$ export KONG_DATABASE=off $ export KONG_DECLARATIVE_CONFIG=kong.yml $ kong start -c kong.conf - 2、动态——在kong运行期间,调用Kong Admin API:
$ http :8001/config config=@kong.yml另外,由于是采用declarative configuration设计,所以只支持Read-Only Admin API,也即:只支持GET;不支持POST, PATCH, PUT or DELETE等Methods
- 1、静态——在kong初始化时指定
- DB mode: 使用imperative configuration,需要使用数据库(PostgreSQL or Cassandra),并通过Kong Admin API对配置进行CRUD操作
这两种模式各有优缺点,如下:
- DB-less mode
- Pros:
- 1、无需使用数据库,减少了对数据库的依赖,减少部署&运维成本
- Cons:
- 1、由于采用declarative configuration设计,更新规则必须全量更新,重置整个配置文件,无法做到局部更新(调用Kong Admin API/config)
- 2、不支持Konga对Kong的管理
- 3、插件兼容性较差,无法支持所有Kong插件,详情见Plugin Compatibility
- Pros:
- DB mode
- Pros:
- 1、支持调用Kong Admin API CRUD,支持局部更新
- 2、支持Konga对Kong的管理
- 3、插件兼容性好,可以支持所有Kong插件
- Cons:
- 1、需要使用数据库,增加了对数据库的依赖,增加部署&运维成本
- Pros:
三、Kong Used As HTTP Proxy
由于Kong DB mode更加便于举例说明,这里我们采用Kong DB mode展示如何使用Kong代理HTTP请求
首先介绍一下Kong Proxy几个关键概念:
- client: Refers to the downstream client making requests to Kong’s proxy port.
- upstream service: Refers to your own API/service sitting behind Kong, to which client requests/connections are forwarded.
- Service: Service entities, as the name implies, are abstractions of each of your own upstream services. Examples of Services would be a data transformation microservice, a billing API, etc.
- Route: This refers to the Kong Routes entity. Routes are entrypoints into Kong, and defining rules for a request to be matched, and routed to a given Service.
- Target: A target is an ip address/hostname with a port that identifies an instance of a backend service. Every upstream can have many targets, and the targets can be dynamically added. Changes are effectuated on the fly.
- Plugin: This refers to Kong “plugins”, which are pieces of business logic that run in the proxying lifecycle. Plugins can be configured through the Admin API - either globally (all incoming traffic) or on specific Routes and Services.
举一个例子对上述概念进行说明:
一个典型的 Nginx 配置:
upstream testUpstream {
    server localhost:3000 weight=100;
}

server {
    listen  80;
    location /test {
        proxy_pass http://testUpstream;
    }
}
转换为Kong Admin API请求如下:
# configurate service
curl -X POST http://localhost:8001/services --data "name=test" --data "host=testUpstream"
# configurate route
curl -X POST http://localhost:8001/routes --data "paths[]=/test" --data "service.id=92956672-f5ea-4e9a-b096-667bf55bc40c"
# configurate upstream
curl -X POST http://localhost:8001/upstreams --data "name=testUpstream"
# configurate target
curl -X POST http://localhost:8001/upstreams/testUpstream/targets --data "target=localhost:3000" --data "weight=100"
从这个例子可以看出:
- Service:Kong服务抽象层,可以直接映射到一个物理服务,也可以指向一个Upstream来做到负载均衡
- Route:Kong路由抽象层,负责将实际请求映射到相应的Service
- Upstream:后端服务抽象,主要用于负载均衡
- Target:代表了Upstream中的一个后端服务,是 ip(hostname) + port 的抽象
也即访问链路:Route => Service => Upstream => Target
下面给一个Kong Used As HTTP Proxy的例子,如下:
# step1: create nginx service
$ cat << EOF > nginx-svc.yml
---
apiVersion: apps/v1
kind: Deployment
metadata:
  name: nginx
  labels:
    app: nginx
spec:
  replicas: 3
  selector:
    matchLabels:
      app: nginx
  template:
    metadata:
      labels:
        app: nginx
    spec:
      containers:
      - name: nginx
        image: nginx:1.15
        ports:
        - containerPort: 80
---
apiVersion: v1
kind: Service
metadata:
  name: nginx
spec:
  selector:
    app: nginx
  ports:
    - protocol: TCP
      port: 80
      targetPort: 80
EOF

$ kubectl apply -f nginx-svc.yml
deployment.apps/nginx created
service/nginx created

$ kubectl get svc
NAME         TYPE        CLUSTER-IP       EXTERNAL-IP   PORT(S)   AGE
nginx        ClusterIP   194.28.255.197   <none>        80/TCP    5h18m

# step2: create kong nginx service
$ curl -s -X POST --url http://194.28.255.207:8001/services/ \
> -d 'name=nginx' \
> -d 'protocol=http' \
> -d 'host=nginxUpstream' \
> -d 'port=80' \
> -d 'path=/' \
> | python -m json.tool
{
    "client_certificate": null,
    "connect_timeout": 60000,
    "created_at": 1580560293,
    "host": "nginxUpstream",
    "id": "14100336-f5d2-48ef-a720-d341afceb466",
    "name": "nginx",
    "path": "/",
    "port": 80,
    "protocol": "http",
    "read_timeout": 60000,
    "retries": 5,
    "tags": null,
    "updated_at": 1580560293,
    "write_timeout": 60000
}

# step3: create kong nginx route
$ curl -s -X POST --url http://194.28.255.207:8001/services/nginx/routes \
> -d 'name=nginx' \
> -d 'hosts[]=nginx-test.duyanghao.com' \
> -d 'paths[]=/' \
> -d 'strip_path=true' \
> -d 'preserve_host=true' \
> -d 'protocols[]=http' \
> | python -m json.tool
{
    "created_at": 1580560619,
    "destinations": null,
    "headers": null,
    "hosts": [
        "nginx-test.duyanghao.com"
    ],
    "https_redirect_status_code": 426,
    "id": "bb678485-0b3e-4e8a-9a46-3e5464fedffc",
    "methods": null,
    "name": "nginx",
    "paths": [
        "/"
    ],
    "preserve_host": true,
    "protocols": [
        "http"
    ],
    "regex_priority": 0,
    "service": {
        "id": "14100336-f5d2-48ef-a720-d341afceb466"
    },
    "snis": null,
    "sources": null,
    "strip_path": true,
    "tags": null,
    "updated_at": 1580560619
}

# step4: create kong nginx upstream
$ curl -s -X POST --url http://194.28.255.207:8001/upstreams \
> -d 'name=nginxUpstream' \
> | python -m json.tool
{
    "algorithm": "round-robin",
    "created_at": 1580560763,
    "hash_fallback": "none",
    "hash_fallback_header": null,
    "hash_on": "none",
    "hash_on_cookie": null,
    "hash_on_cookie_path": "/",
    "hash_on_header": null,
    "healthchecks": {
        "active": {
            "concurrency": 10,
            "healthy": {
                "http_statuses": [
                    200,
                    302
                ],
                "interval": 0,
                "successes": 0
            },
            "http_path": "/",
            "https_sni": null,
            "https_verify_certificate": true,
            "timeout": 1,
            "type": "http",
            "unhealthy": {
                "http_failures": 0,
                "http_statuses": [
                    429,
                    404,
                    500,
                    501,
                    502,
                    503,
                    504,
                    505
                ],
                "interval": 0,
                "tcp_failures": 0,
                "timeouts": 0
            }
        },
        "passive": {
            "healthy": {
                "http_statuses": [
                    200,
                    201,
                    202,
                    203,
                    204,
                    205,
                    206,
                    207,
                    208,
                    226,
                    300,
                    301,
                    302,
                    303,
                    304,
                    305,
                    306,
                    307,
                    308
                ],
                "successes": 0
            },
            "type": "http",
            "unhealthy": {
                "http_failures": 0,
                "http_statuses": [
                    429,
                    500,
                    503
                ],
                "tcp_failures": 0,
                "timeouts": 0
            }
        }
    },
    "id": "a4c88440-bd50-48f1-8926-527d02abc4a2",
    "name": "nginxUpstream",
    "slots": 10000,
    "tags": null
}

# step5: create kong nginx target
$ curl -s -X POST --url http://194.28.255.207:8001/upstreams/nginxUpstream/targets -d 'target=194.28.255.197:80' | python -m json.tool
{
    "created_at": 1580570363.097,
    "id": "09871dc5-5ede-4ea3-b232-e52501be071a",
    "target": "194.28.255.197:80",
    "upstream": {
        "id": "a4c88440-bd50-48f1-8926-527d02abc4a2"
    },
    "weight": 100
}

# Test forward through Kong
$ curl -s -X GET \
    --url http://194.28.255.9:8000/ \
    --header 'Host: nginx-test.duyanghao.com'
<!DOCTYPE html>
<html>
<head>
<title>Welcome to nginx!</title>
<style>
    body {
        width: 35em;
        margin: 0 auto;
        font-family: Tahoma, Verdana, Arial, sans-serif;
    }
</style>
</head>
<body>
<h1>Welcome to nginx!</h1>
<p>If you see this page, the nginx web server is successfully installed and
working. Further configuration is required.</p>

<p>For online documentation and support please refer to
<a href="http://nginx.org/">nginx.org</a>.<br/>
Commercial support is available at
<a href="http://nginx.com/">nginx.com</a>.</p>

<p><em>Thank you for using nginx.</em></p>
</body>
</html>
可以看到通过Kong Admin API创建Service、Route、Upstream以及Target等配置后,Kong成功地代理了nginx service的请求
另外,Kong除了可以代理HTTP请求,还可以作为WebSocket、TCP以及gRPC Proxy,详见Kong proxy
四、Kong Plugins
You’ve probably heard that Kong is built on Nginx, leveraging its stability and efficiency. But how is this possible exactly?
To be more precise, Kong is a Lua application running in Nginx and made possible by the lua-nginx-module. Instead of compiling Nginx with this module, Kong is distributed along with OpenResty, which already includes lua-nginx-module. OpenResty is not a fork of Nginx, but a bundle of modules extending its capabilities.
This sets the foundations for a pluggable architecture, where Lua scripts (referred to as ”plugins”) can be enabled and executed at runtime. Because of this, we like to think of Kong as a paragon of microservice architecture: at its core, it implements database abstraction, routing and plugin management. Plugins can live in separate code bases and be injected anywhere into the request lifecycle, all in a few lines of code.
由于Kong是OpenResty 应用程序,天然支持Lua插件,我们可以给Kong Service或者Route等属性添加插件,来达到更多定制化需求,如下:
# add plugin for kong nginx service
$ curl -X POST http://194.28.255.207:8001/services/nginx/plugins \
--data "name=rate-limiting" \
--data "config.second=50" \
| python -m json.tool
{
    "config": {
        "day": null,
        "fault_tolerant": true,
        "hide_client_headers": false,
        "hour": null,
        "limit_by": "consumer",
        "minute": null,
        "month": null,
        "policy": "cluster",
        "redis_database": 0,
        "redis_host": null,
        "redis_password": null,
        "redis_port": 6379,
        "redis_timeout": 2000,
        "second": 50,
        "year": null
    },
    "consumer": null,
    "created_at": 1580567002,
    "enabled": true,
    "id": "ce629c6f-046a-45fa-bb0a-2e6aaea70a83",
    "name": "rate-limiting",
    "protocols": [
        "grpc",
        "grpcs",
        "http",
        "https"
    ],
    "route": null,
    "run_on": "first",
    "service": {
        "id": "14100336-f5d2-48ef-a720-d341afceb466"
    },
    "tags": null
}

# Test forward through Kong
$ curl -v -s -X GET \
    --url http://194.28.255.9:8000/ \
    --header 'Host: nginx-test.duyanghao.com'

< HTTP/1.1 200 OK
< Content-Type: text/html; charset=UTF-8
< Content-Length: 612
< Connection: keep-alive
< Server: nginx/1.15.12
< Date: Sat, 01 Feb 2020 14:33:29 GMT
< Vary: Accept-Encoding
< Last-Modified: Tue, 16 Apr 2019 13:08:19 GMT
< ETag: "5cb5d3c3-264"
< Accept-Ranges: bytes
< X-RateLimit-Remaining-second: 49
< X-RateLimit-Limit-second: 50
< X-Kong-Upstream-Latency: 1
< X-Kong-Proxy-Latency: 11
< Via: kong/1.4.2
<
<!DOCTYPE html>
<html>
<head>
<title>Welcome to nginx!</title>
<style>
    body {
        width: 35em;
        margin: 0 auto;
        font-family: Tahoma, Verdana, Arial, sans-serif;
    }
</style>
</head>
<body>
<h1>Welcome to nginx!</h1>
<p>If you see this page, the nginx web server is successfully installed and
working. Further configuration is required.</p>

<p>For online documentation and support please refer to
<a href="http://nginx.org/">nginx.org</a>.<br/>
Commercial support is available at
<a href="http://nginx.com/">nginx.com</a>.</p>

<p><em>Thank you for using nginx.</em></p>
</body>
</html>

# add plugin for kong nginx route
$ curl -X POST http://194.28.255.207:8001/routes/nginx/plugins \
--data "name=rate-limiting" \
--data "config.second=50" \
| python -m json.tool
{
    "config": {
        "day": null,
        "fault_tolerant": true,
        "hide_client_headers": false,
        "hour": null,
        "limit_by": "consumer",
        "minute": null,
        "month": null,
        "policy": "cluster",
        "redis_database": 0,
        "redis_host": null,
        "redis_password": null,
        "redis_port": 6379,
        "redis_timeout": 2000,
        "second": 50,
        "year": null
    },
    "consumer": null,
    "created_at": 1580567880,
    "enabled": true,
    "id": "f4e18187-b24e-437c-95e3-485589f0e326",
    "name": "rate-limiting",
    "protocols": [
        "grpc",
        "grpcs",
        "http",
        "https"
    ],
    "route": {
        "id": "bb678485-0b3e-4e8a-9a46-3e5464fedffc"
    },
    "run_on": "first",
    "service": null,
    "tags": null
}

# Test forward through Kong
$ curl -v -s -X GET \
    --url http://194.28.255.9:8000/ \
    --header 'Host: nginx-test.duyanghao.com'

< HTTP/1.1 200 OK
< Content-Type: text/html; charset=UTF-8
< Content-Length: 612
< Connection: keep-alive
< Server: nginx/1.15.12
< Date: Sat, 01 Feb 2020 14:54:14 GMT
< Vary: Accept-Encoding
< Last-Modified: Tue, 16 Apr 2019 13:08:19 GMT
< ETag: "5cb5d3c3-264"
< Accept-Ranges: bytes
< X-RateLimit-Remaining-second: 49
< X-RateLimit-Limit-second: 50
< X-Kong-Upstream-Latency: 1
< X-Kong-Proxy-Latency: 6
< Via: kong/1.4.2
<
<!DOCTYPE html>
<html>
<head>
<title>Welcome to nginx!</title>
<style>
    body {
        width: 35em;
        margin: 0 auto;
        font-family: Tahoma, Verdana, Arial, sans-serif;
    }
</style>
</head>
<body>
<h1>Welcome to nginx!</h1>
<p>If you see this page, the nginx web server is successfully installed and
working. Further configuration is required.</p>

<p>For online documentation and support please refer to
<a href="http://nginx.org/">nginx.org</a>.<br/>
Commercial support is available at
<a href="http://nginx.com/">nginx.com</a>.</p>

<p><em>Thank you for using nginx.</em></p>
</body>
</html>
Kong-ingress-controller
上述Kong Used As HTTP Proxy给出了使用Admin API配置Kong来访问Kubernetes nginx service的例子,这种方法属于Kong原生的方式,并没有针对Kubernetes进行定制。如果像上述例子一样采用Kong Admin API对Kubernetes service进行访问设置,则需要我们自己开发对应的Kong API CRUD逻辑。而Kong官方为了解决这个共性问题(也是为了扩展Kong Cloud-Native的使用场景)创建了kubernetes-ingress-controller项目
一、Kong-ingress-controller Principle
Kong-ingress-controller采用标准的Kubernetes Operator(CRDs + Controller)模式编写,按组件分为:
- Kong, the core proxy that handles all the traffic
- Controller, a process that syncs the configuration from Kubernetes to Kong
整个架构类似nginx-ingress-controller(Nginx + Controller),原理如下:

Controller会监控Kubernetes集群中资源的变化,然后更新Kong相应的配置使其代理Kubernetes服务,这里面就存在Kubernetes资源与Kong资源对应的关系,如下:
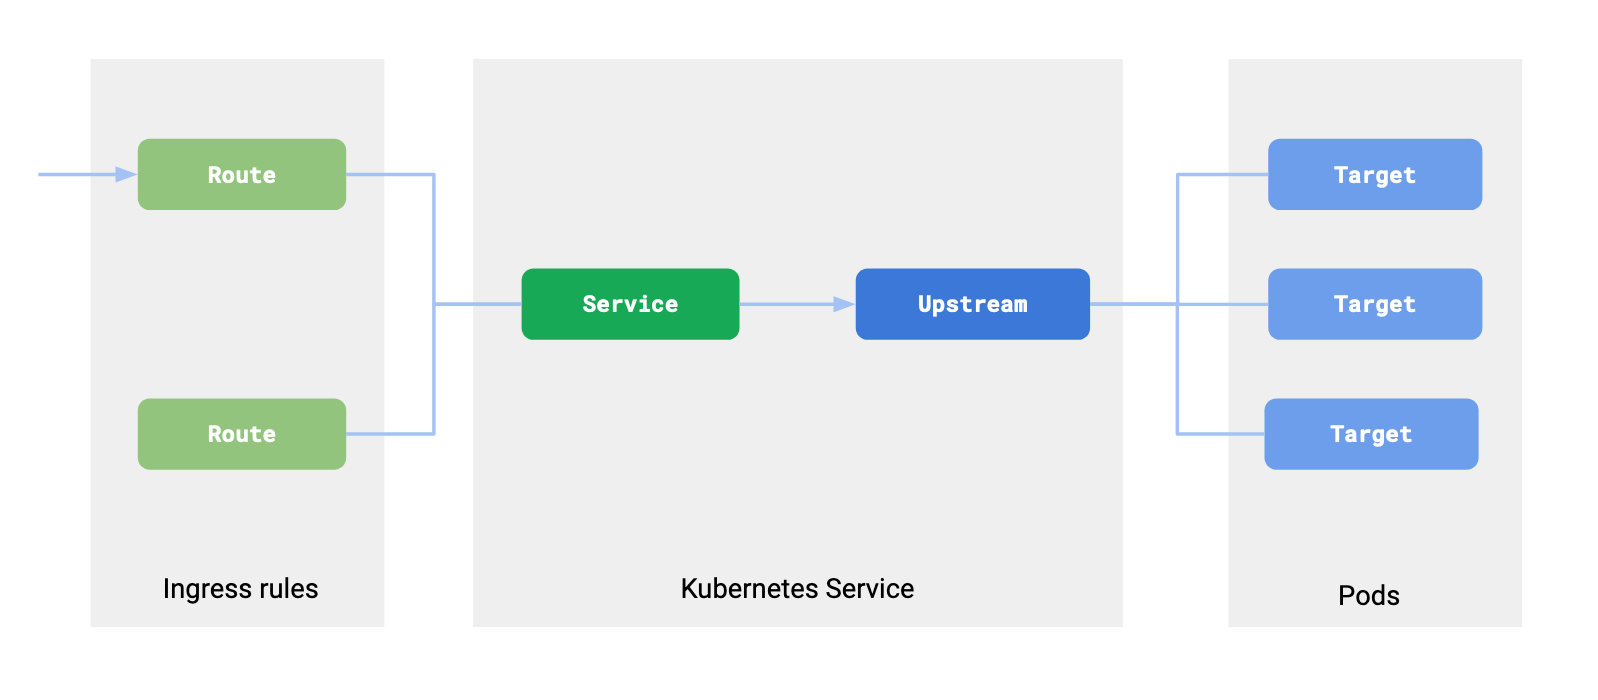
- An Ingress resource in Kubernetes defines a set of rules for proxying traffic. These rules corresponds to the concept or Route in Kong.
- A Service inside Kubernetes is a way to abstract an application that is running on a set of pods. This maps to two objects in Kong: Service and Upstream. The service object in Kong holds the information on the protocol to use to talk to the upstream service and various other protocol specific settings. The Upstream object defines load balancing and healthchecking behavior.
- Pods associated with a Service in Kubernetes map as a Target belonging to the Upstream (the upstream corresponding to the Kubernetes Service) in Kong. Kong load balances across the Pods of your service. This means that all requests flowing through Kong are not directed via kube-proxy but directly to the pod.
也即Kong巧妙地将Kubernetes Ingress转化为Kong Route;Kubernetes Service转化为Kong Service&Upstream;Kubernetes Pod转化为Kong Target。最终实现Kong代理Kubernetes服务
二、Kong-ingress-controller Install&Usage
我们按照官方指引安装kong-ingress-controller,如下:
# install kong-ingress-controller
$ kubectl apply -f https://bit.ly/k4k8s
namespace/kong created
customresourcedefinition.apiextensions.k8s.io/kongconsumers.configuration.konghq.com created
customresourcedefinition.apiextensions.k8s.io/kongcredentials.configuration.konghq.com created
customresourcedefinition.apiextensions.k8s.io/kongingresses.configuration.konghq.com created
customresourcedefinition.apiextensions.k8s.io/kongplugins.configuration.konghq.com created
serviceaccount/kong-serviceaccount created
clusterrole.rbac.authorization.k8s.io/kong-ingress-clusterrole created
clusterrolebinding.rbac.authorization.k8s.io/kong-ingress-clusterrole-nisa-binding created
configmap/kong-server-blocks created
service/kong-admin created
service/kong-proxy created
service/kong-validation-webhook created
deployment.apps/ingress-kong created

# kubectl get all -nkong
NAME                                READY   STATUS    RESTARTS   AGE
pod/ingress-kong-7875999c56-cbfzs   2/2     Running   1          2m59s

NAME                              TYPE        CLUSTER-IP      EXTERNAL-IP   PORT(S)                      AGE
service/kong-admin                ClusterIP   194.71.71.166   <none>        8001/TCP                     2m59s
service/kong-proxy                NodePort    194.71.138.94   <none>        80:8000/TCP,443:8443/TCP   2m59s
service/kong-validation-webhook   ClusterIP   194.71.9.238    <none>        443/TCP                      2m59s

NAME                           READY   UP-TO-DATE   AVAILABLE   AGE
deployment.apps/ingress-kong   1/1     1            1           2m59s

NAME                                      DESIRED   CURRENT   READY   AGE
replicaset.apps/ingress-kong-7875999c56   1         1         1       2m59s
安装完kong-ingress-controller后,我们创建nginx svc&ingress,如下:
# step1: create nginx svc&ingress
$ cat << EOF > nginx-svc.yml
---
apiVersion: apps/v1
kind: Deployment
metadata:
  name: nginx
  labels:
    app: nginx
spec:
  replicas: 3
  selector:
    matchLabels:
      app: nginx
  template:
    metadata:
      labels:
        app: nginx
    spec:
      containers:
      - name: nginx
        image: nginx:1.15
        ports:
        - containerPort: 80
---
apiVersion: v1
kind: Service
metadata:
  name: nginx
spec:
  selector:
    app: nginx
  ports:
    - protocol: TCP
      port: 80
      targetPort: 80
---
apiVersion: networking.k8s.io/v1beta1
kind: Ingress
metadata:
  name: nginx
spec:
  rules:
  - host: nginx-test.duyanghao.com
    http:
      paths:
      - path: /
        backend:
          serviceName: nginx
          servicePort: 80
EOF

$ kubectl apply -f nginx-svc.yml
deployment.apps/nginx created
service/nginx created
ingress.networking.k8s.io/nginx created
创建完nginx service&ingress后,我们访问nginx如下:
# Test forward through Kong
$ curl -s -X GET \
    --url http://194.71.138.94:8000/ \
    --header 'Host: nginx-test.duyanghao.com'
<!DOCTYPE html>
<html>
<head>
<title>Welcome to nginx!</title>
<style>
    body {
        width: 35em;
        margin: 0 auto;
        font-family: Tahoma, Verdana, Arial, sans-serif;
    }
</style>
</head>
<body>
<h1>Welcome to nginx!</h1>
<p>If you see this page, the nginx web server is successfully installed and
working. Further configuration is required.</p>

<p>For online documentation and support please refer to
<a href="http://nginx.org/">nginx.org</a>.<br/>
Commercial support is available at
<a href="http://nginx.com/">nginx.com</a>.</p>

<p><em>Thank you for using nginx.</em></p>
</body>
</html>
可以看到,相比Kong原生的用法,这里没有调用Kong Admin API创建各种Kong属性,而只是添加了一个Kubernetes Ingress,就可以直接访问服务了,简单且实用
三、Kong-ingress-controller CRDs
Kong Ingress Controller performs more than just proxying the traffic coming into a Kubernetes cluster. It is possible to configure plugins, load balancing, health checking and leverage all that Kong offers in a standalone installation.
Kong-ingress-controller原则上可以完成Kong所涵盖的所有特性。为此,Kong-ingress-controller给出了四种CRDs对功能进行扩展,如下:
这里主要介绍KongIngress与KongPlugin CRDs的用法:
Kong-ingress-controller CRDs-KongIngress
The Ingress resource in Kubernetes is a fairly narrow and ambiguous API, and
doesn’t offer resources to describe the specifics of proxying.
To overcome this limitation, KongIngress Custom Resource is used as an
“extension” to the existing Ingress API to provide fine-grained control
over proxy behavior.
In other words, KongIngress works in conjunction with
the existing Ingress resource and extends it.
It is not meant as a replacement for the Ingress resource in Kubernetes.
Using KongIngress, all properties of Upstream,
Service and Route
entities in Kong related to an Ingress resource can be modified.
Once a KongIngress resource is created, you can use the configuration.konghq.com
annotation to associate the KongIngress resource with an Ingress or a Service
resource:
- When the annotation is added to the
Ingressresource, the routing configurations are updated, meaning all routes associated with the annotatedIngressare updated to use the values defined in theKongIngress’s route section. - When the annotation is added to a
Serviceresource in Kubernetes, the correspondingServiceandUpstreamin Kong are updated to use theproxyandupstreamblocks as defined in the associatedKongIngressresource.
The below diagram shows how the resources are linked with one another:
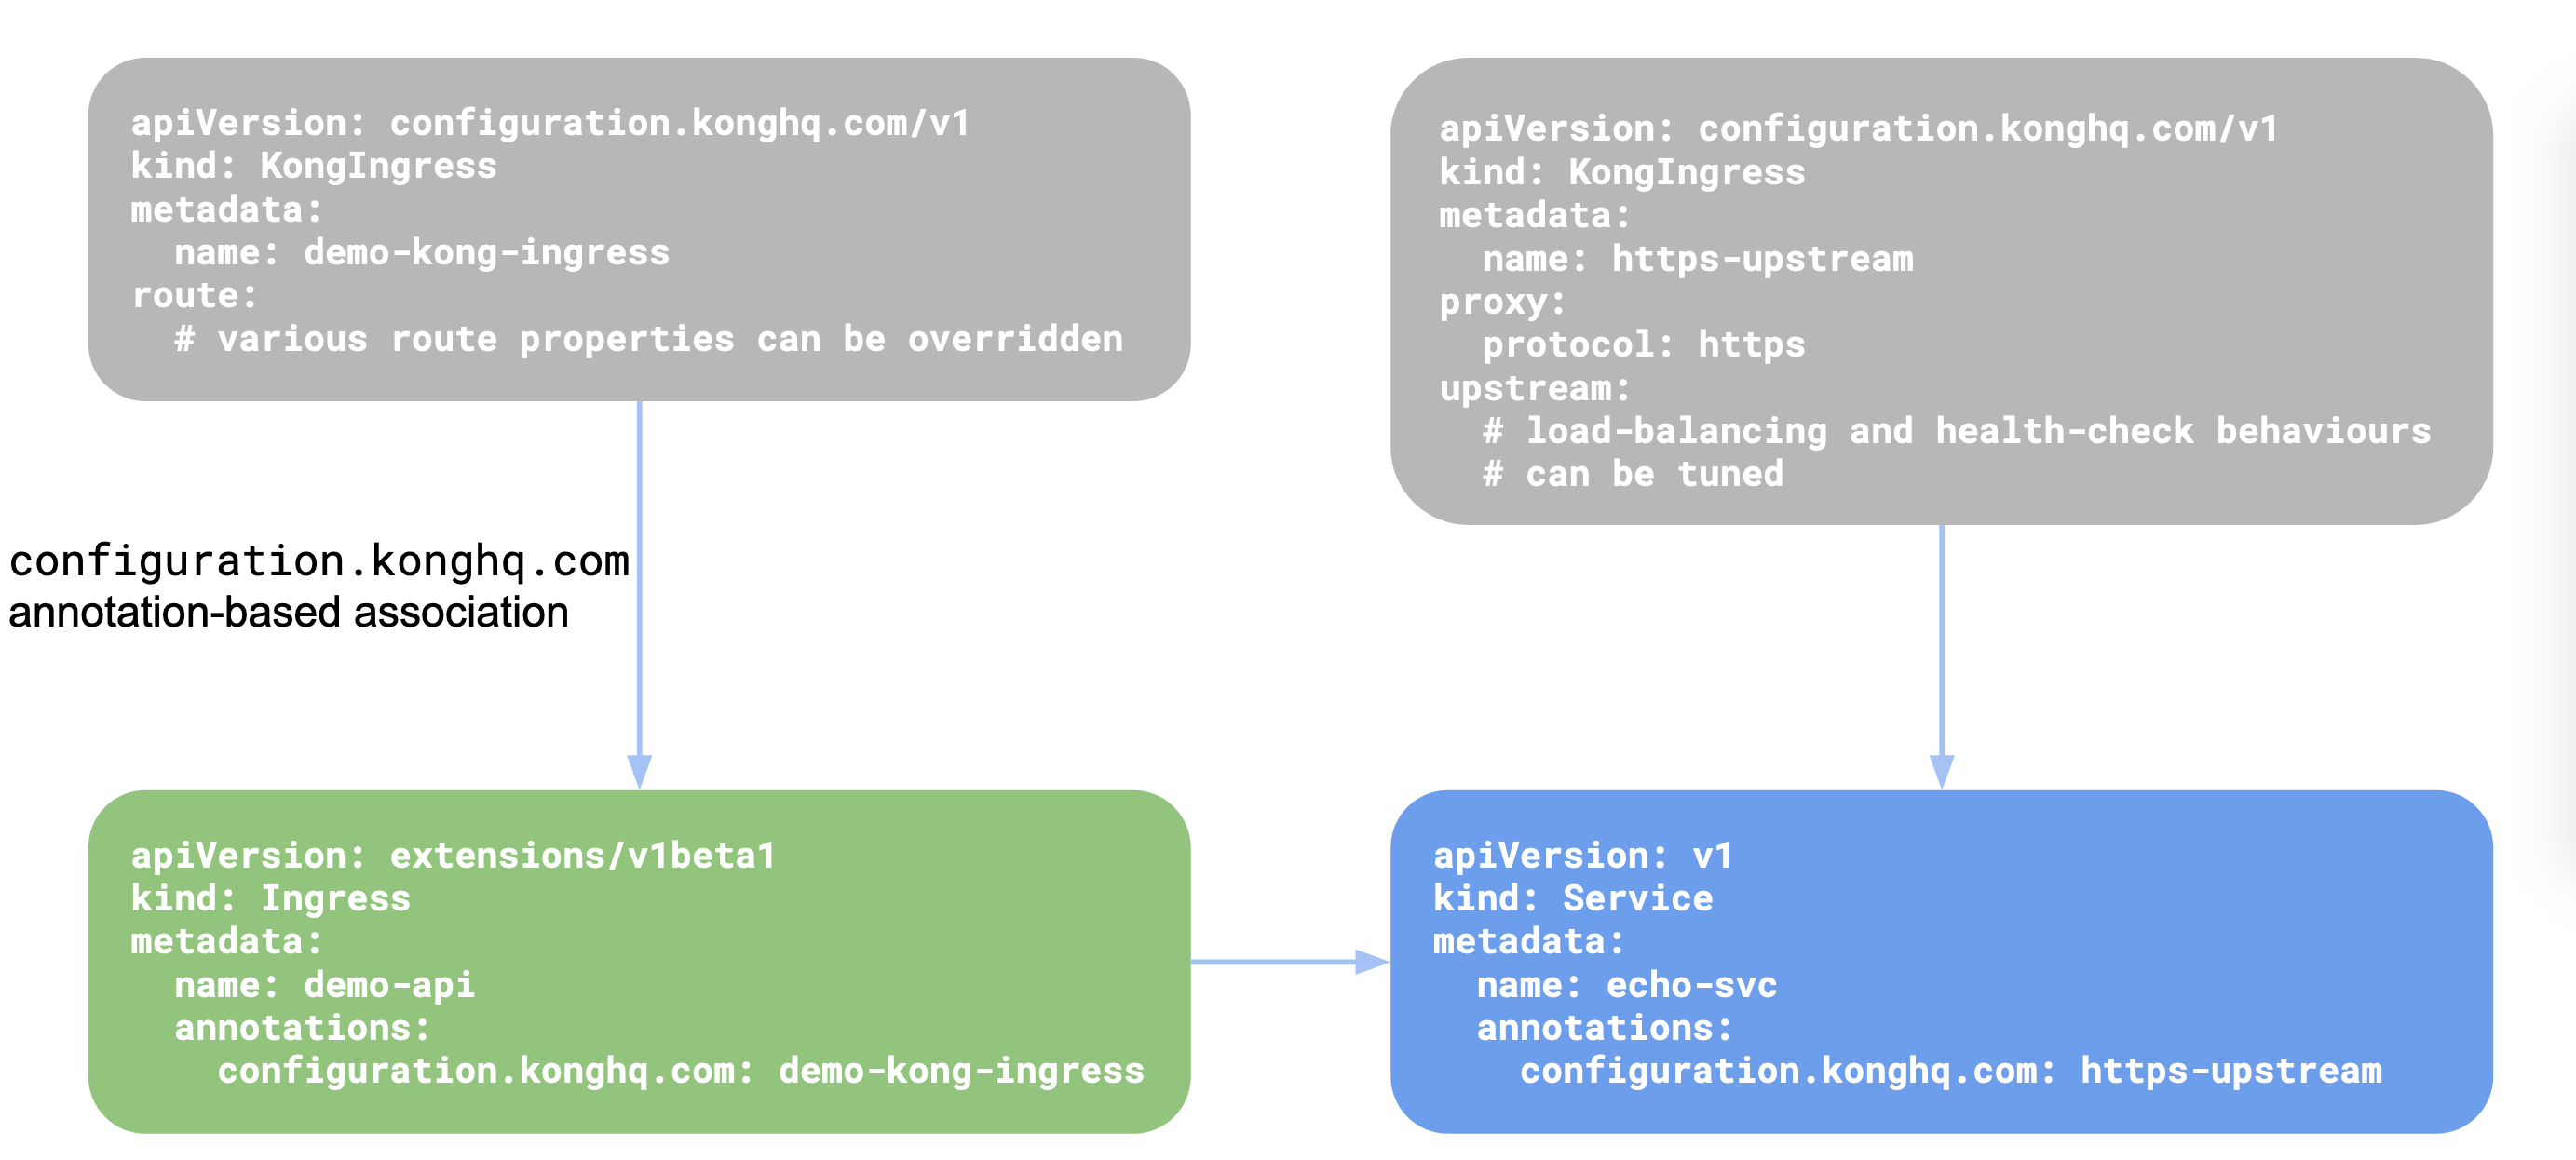
也即:KongIngress用于扩展Kubernetes Ingress资源功能,从而更加细粒度控制代理行为。这里举例进行说明:
# Example1: Use KongIngress with Ingress resource
# Install a dummy service
$ cat << EOF > echo-service.yaml
---
apiVersion: v1
kind: Service
metadata:
  labels:
    app: echo
  name: echo
spec:
  ports:
  - port: 8080
    name: high
    protocol: TCP
    targetPort: 8080
  - port: 80
    name: low
    protocol: TCP
    targetPort: 8080
  selector:
    app: echo
---
apiVersion: apps/v1
kind: Deployment
metadata:
  labels:
    app: echo
  name: echo
spec:
  replicas: 1
  selector:
    matchLabels:
      app: echo
  strategy: {}
  template:
    metadata:
      creationTimestamp: null
      labels:
        app: echo
    spec:
      containers:
      - image: gcr.io/kubernetes-e2e-test-images/echoserver:2.2
        name: echo
        ports:
        - containerPort: 8080
        env:
          - name: NODE_NAME
            valueFrom:
              fieldRef:
                fieldPath: spec.nodeName
          - name: POD_NAME
            valueFrom:
              fieldRef:
                fieldPath: metadata.name
          - name: POD_NAMESPACE
            valueFrom:
              fieldRef:
                fieldPath: metadata.namespace
          - name: POD_IP
            valueFrom:
              fieldRef:
                fieldPath: status.podIP
        resources: {}
EOF
$ kubectl apply -f echo-service.yaml
service/echo created
deployment.apps/echo created

# Setup Ingress
$ echo "
apiVersion: extensions/v1beta1
kind: Ingress
metadata:
  name: demo
spec:
  rules:
  - http:
      paths:
      - path: /foo
        backend:
          serviceName: echo
          servicePort: 80
" | kubectl apply -f -
ingress.extensions/demo created

# Let's test
$ curl -i http://194.71.138.94:8000/foo
HTTP/1.1 200 OK
Content-Type: text/plain; charset=UTF-8
Transfer-Encoding: chunked
Connection: keep-alive
Date: Sun, 02 Feb 2020 07:42:28 GMT
Server: echoserver
X-Kong-Upstream-Latency: 0
X-Kong-Proxy-Latency: 1
Via: kong/1.4.2


Hostname: echo-85fb7989cc-kk7r6

Pod Information:
        node name:      vm-xxx-centos
        pod name:       echo-85fb7989cc-kk7r6
        pod namespace:  default
        pod IP: 194.70.0.21

Server values:
        server_version=nginx: 1.12.2 - lua: 10010

Request Information:
        client_address=194.70.0.17
        method=GET
        real path=/
        query=
        request_version=1.1
        request_scheme=http
        request_uri=http://194.71.138.94:8080/

# Kong will strip the path defined in the Ingress rule before proxying the request to the service. This can be seen in the real path value in the above response.
# We can configure Kong to not strip out this path and to only respond to GET requests for this particular Ingress rule.
# create a KongIngress resource
$ echo "apiVersion: configuration.konghq.com/v1
kind: KongIngress
metadata:
  name: sample-customization
route:
  methods:
  - GET
  strip_path: false" | kubectl apply -f -
kongingress.configuration.konghq.com/sample-customization created

# Now, let's associate this KongIngress resource with our Ingress resource using the configuration.konghq.com annotation.
$ kubectl patch ingress demo -p '{"metadata":{"annotations":{"configuration.konghq.com":"sample-customization"}}}'
ingress.extensions/demo patched

# Now, Kong will proxy only GET requests on /foo path and not strip away /foo:
$ curl -s http://194.71.138.94:8000/foo -X POST
{"message":"no Route matched with those values"}

$ curl -i http://194.71.138.94:8000/foo
HTTP/1.1 200 OK
Content-Type: text/plain; charset=UTF-8
Transfer-Encoding: chunked
Connection: keep-alive
Date: Sun, 02 Feb 2020 07:54:39 GMT
Server: echoserver
X-Kong-Upstream-Latency: 0
X-Kong-Proxy-Latency: 0
Via: kong/1.4.2


Hostname: echo-85fb7989cc-kk7r6

Pod Information:
        node name:      vm-xxx-centos
        pod name:       echo-85fb7989cc-kk7r6
        pod namespace:  default
        pod IP: 194.70.0.21

Server values:
        server_version=nginx: 1.12.2 - lua: 10010

Request Information:
        client_address=194.70.0.17
        method=GET
        real path=/foo
        query=
        request_version=1.1
        request_scheme=http
        request_uri=http://194.71.138.94:8080/foo

# Example2: Use KongIngress with Service resource
# KongIngress can be used to change load-balancing, health-checking and other proxy behaviours in Kong.
# Next, we are going to tweak two settings:
# 1、Configure Kong to hash the requests based on IP address of the client.
# 2、Configure Kong to proxy all the request on /foo to /bar.

# Let's create a KongIngress resource with these settings
$ echo 'apiVersion: configuration.konghq.com/v1
kind: KongIngress
metadata:
  name: demo-customization
upstream:
  hash_on: ip
proxy:
  path: /bar/' | kubectl apply -f -
kongingress.configuration.konghq.com/demo-customization created

# Now, let's associate this KongIngress resource to the echo service.
$ kubectl patch service echo -p '{"metadata":{"annotations":{"configuration.konghq.com":"demo-customization"}}}'
service/echo patched

# Let's test this now
$ curl -i http://194.71.138.94:8000/foo
HTTP/1.1 200 OK
Content-Type: text/plain; charset=UTF-8
Transfer-Encoding: chunked
Connection: keep-alive
Date: Sun, 02 Feb 2020 08:11:42 GMT
Server: echoserver
X-Kong-Upstream-Latency: 1
X-Kong-Proxy-Latency: 0
Via: kong/1.4.2


Hostname: echo-85fb7989cc-kk7r6

Pod Information:
        node name:      vm-xxx-centos
        pod name:       echo-85fb7989cc-kk7r6
        pod namespace:  default
        pod IP: 194.70.0.21

Server values:
        server_version=nginx: 1.12.2 - lua: 10010

Request Information:
        client_address=194.70.0.17
        method=GET
        real path=/bar/foo
        query=
        request_version=1.1
        request_scheme=http
        request_uri=http://194.71.138.94:8080/bar/foo

# Real path received by the upstream service (echo) is now changed to /bar/foo
# Also, now all the requests will be sent to the same upstream pod:
$ curl -s 194.71.138.94:8000/foo | grep "pod IP"
	pod IP:	194.70.0.21
$ curl -s 194.71.138.94:8000/foo | grep "pod IP"
	pod IP:	194.70.0.21
$ curl -s 194.71.138.94:8000/foo | grep "pod IP"
	pod IP:	194.70.0.21
Kong-ingress-controller CRDs-KongPlugin
Kong is designed around an extensible plugin architecture and comes with a wide variety of plugins already bundled inside it. These plugins can be used to modify the request/response or impose restrictions on the traffic.
Once this resource is created, the resource needs to be associated with an
Ingress, Service, or KongConsumer resource in Kubernetes.
For more details, please read the reference documentation on KongPlugin.
The below diagram shows how the KongPlugin resource can be linked to an
Ingress, Service, or KongConsumer:
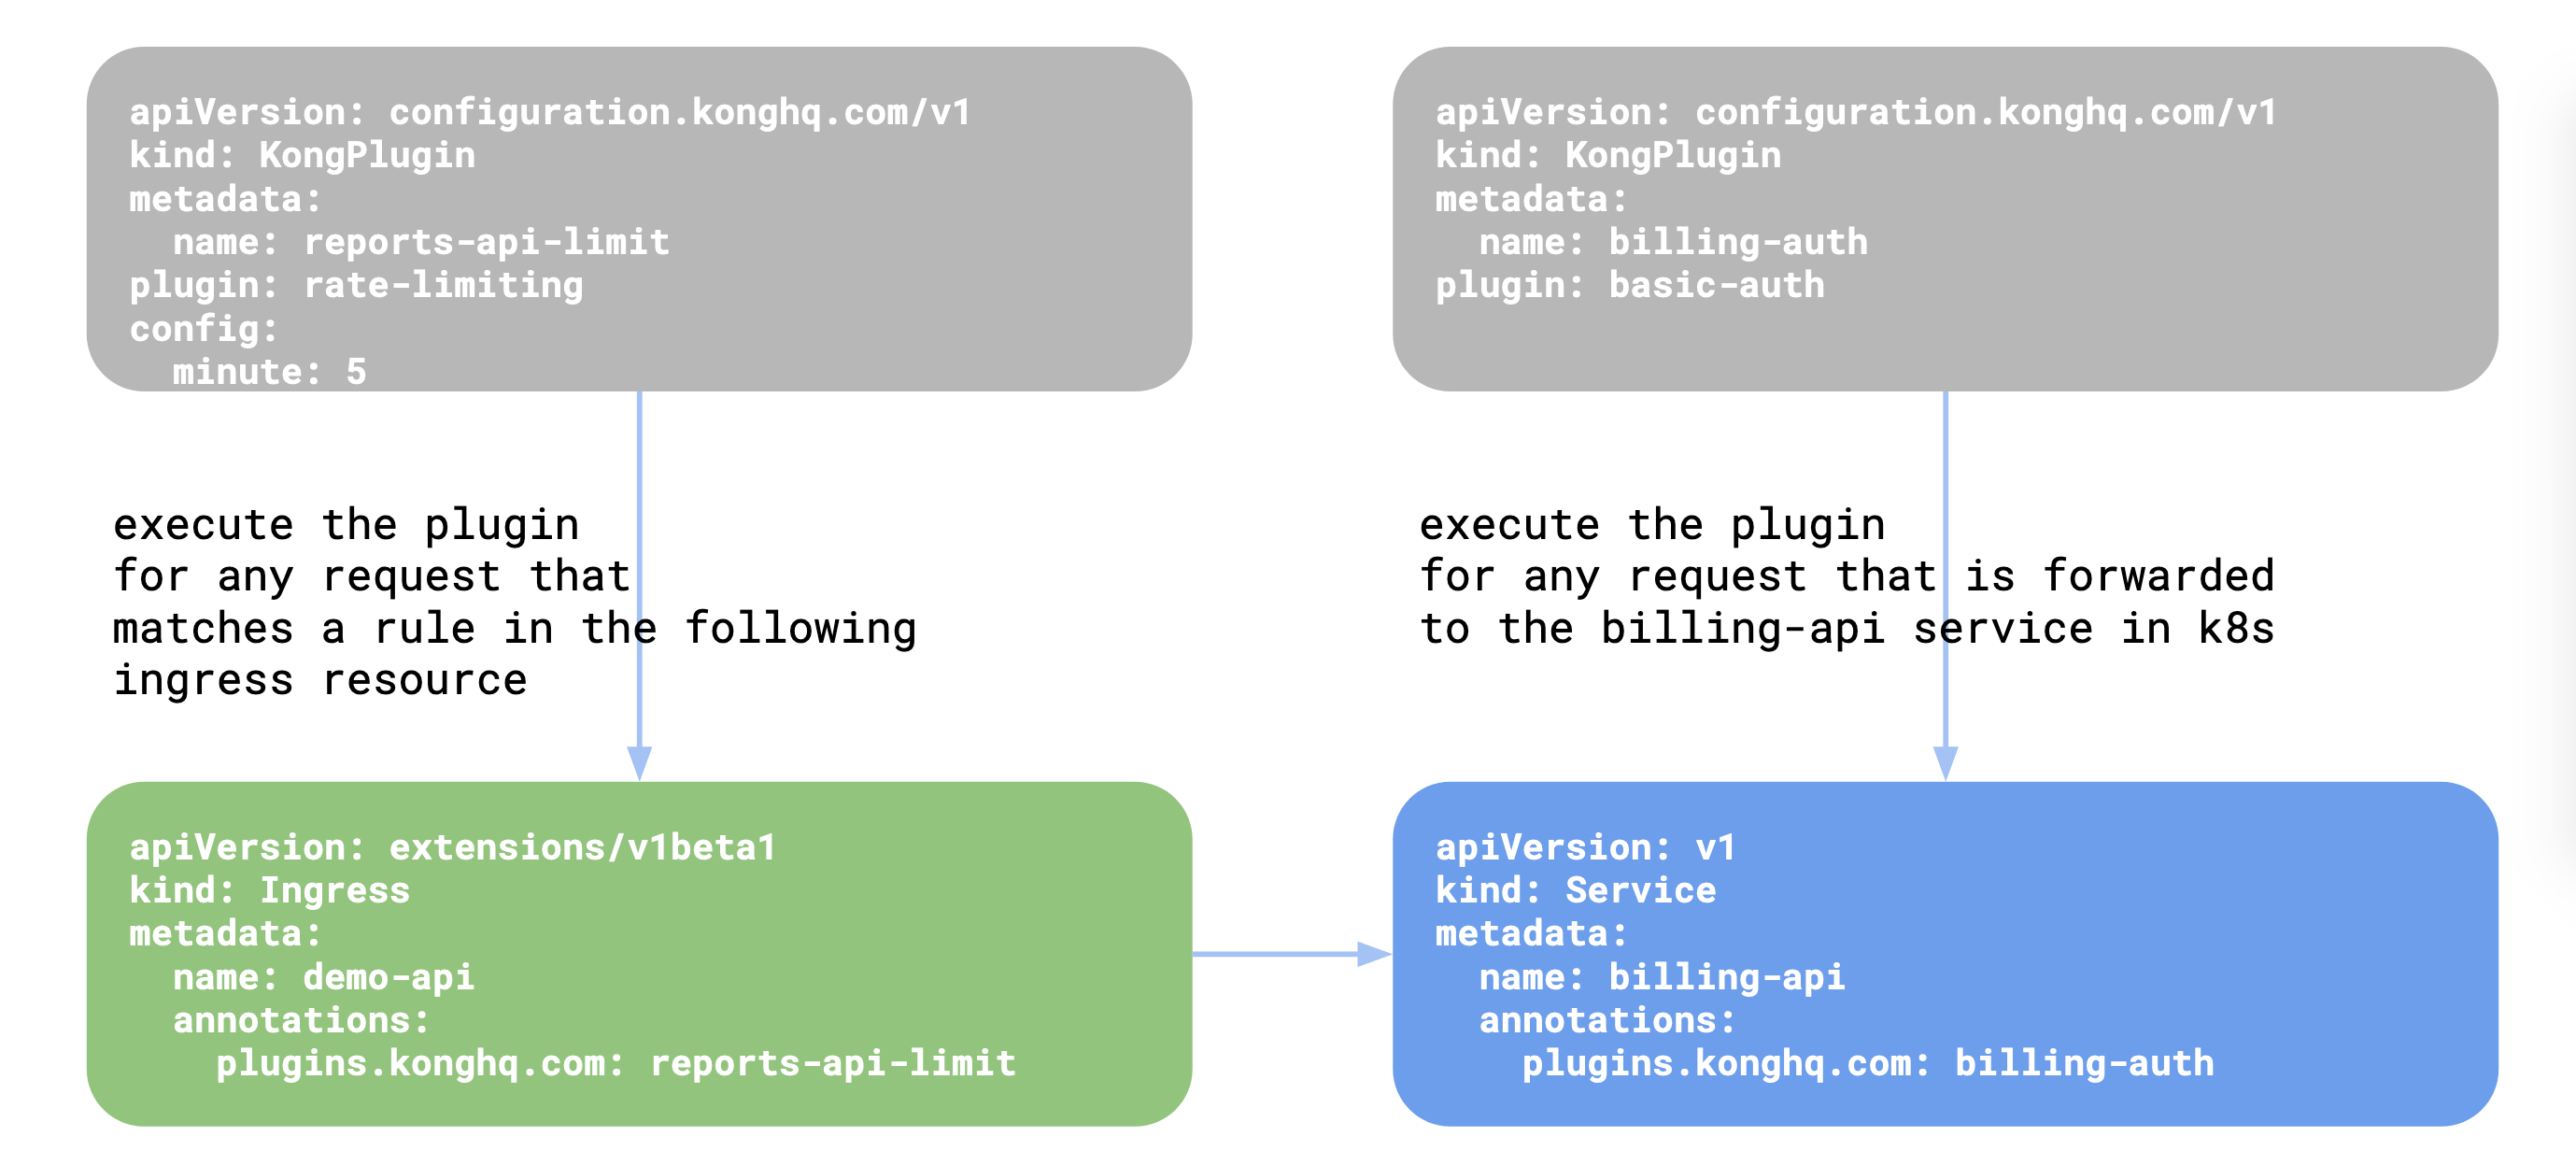
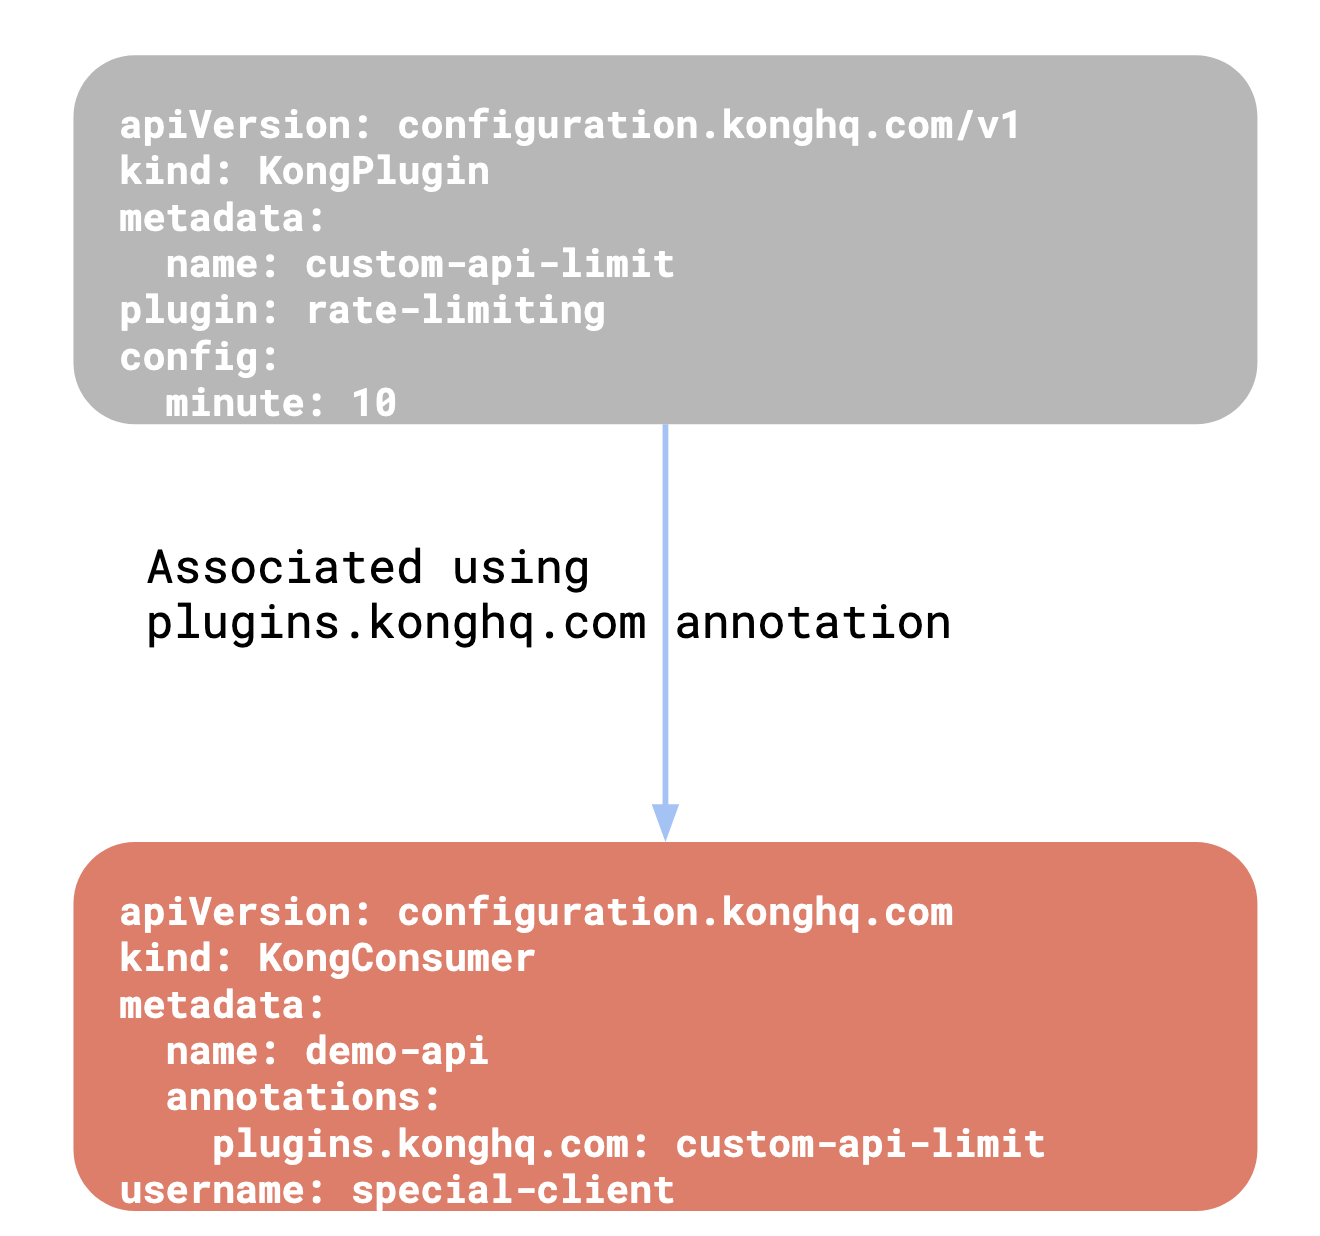
也即:KongPlugin用于给Kubernetes服务提供Kong插件功能。这里举例进行说明:
# start httpbin service.
$ cat << EOF > httpbin.yaml
---
apiVersion: v1
kind: Service
metadata:
  name: httpbin
  labels:
    app: httpbin
spec:
  ports:
  - name: http
    port: 80
    targetPort: 80
  selector:
    app: httpbin
---
apiVersion: apps/v1
kind: Deployment
metadata:
  name: httpbin
spec:
  replicas: 1
  selector:
    matchLabels:
      app: httpbin
  template:
    metadata:
      labels:
        app: httpbin
    spec:
      containers:
      - image: docker.io/kennethreitz/httpbin
        name: httpbin
        ports:
        - containerPort: 80
EOF

$ kubectl apply -f httpbin.yaml
service/httpbin created
deployment.apps/httpbin created

# Setup Ingress rules
$ echo "
apiVersion: extensions/v1beta1
kind: Ingress
metadata:
  name: demo2
spec:
  rules:
  - http:
      paths:
      - path: /baz
        backend:
          serviceName: httpbin
          servicePort: 80
" | kubectl apply -f -
ingress.extensions/demo2 created

# Let's test
$ curl -i http://194.71.138.94:8000/baz/status/200
HTTP/1.1 200 OK
Content-Type: text/html; charset=utf-8
Content-Length: 0
Connection: keep-alive
Server: gunicorn/19.9.0
Date: Sun, 02 Feb 2020 09:19:11 GMT
Access-Control-Allow-Origin: *
Access-Control-Allow-Credentials: true
X-Kong-Upstream-Latency: 1
X-Kong-Proxy-Latency: 0
Via: kong/1.4.2

# Configuring plugins on Ingress resource
# First, we will create a KongPlugin resource
$ echo '
apiVersion: configuration.konghq.com/v1
kind: KongPlugin
metadata:
  name: add-response-header
config:
  add:
    headers:
    - "demo: injected-by-kong"
plugin: response-transformer
' | kubectl apply -f -
kongplugin.configuration.konghq.com/add-response-header created

# Next, we will associate it with our Ingress rules
$ kubectl patch ingress demo2 -p '{"metadata":{"annotations":{"plugins.konghq.com":"add-response-header"}}}'
ingress.extensions/demo2 patched

# Here, we are asking Kong Ingress Controller to execute the response-transformer plugin whenever a request matching the Ingress rule is processed
# Let's test it out
$ curl -i http://194.71.138.94:8000/baz/status/200
HTTP/1.1 200 OK
Content-Type: text/html; charset=utf-8
Content-Length: 0
Connection: keep-alive
Server: gunicorn/19.9.0
Date: Sun, 02 Feb 2020 09:22:44 GMT
Access-Control-Allow-Origin: *
Access-Control-Allow-Credentials: true
demo:  injected-by-kong
X-Kong-Upstream-Latency: 1
X-Kong-Proxy-Latency: 0
Via: kong/1.4.2

# As can be seen in the output, the demo header is injected by Kong when the request matches the Ingress rules defined in the demo Ingress resource.
注意区分与原生Kong添加插件在使用上的差别,更多例子详见using-kongplugin-resource
四、 Kong-ingress-controller High-Availability
Kong Ingress Controller is designed to be reasonably easy to operate and be highly available, meaning, when some expected failures do occur, the Controller should be able to continue to function with minimum possible service disruption.
Kong Ingress Controller is composed of two parts: 1. Kong, which handles the rquests, 2. Controller, which configures Kong dynamically.
Kong itself can be deployed in a Highly available manner by deploying multiple instances (or pods). Kong nodes are state-less, meaning a Kong pod can be terminated and restarted at any point of time.
The controller itself can be stateful or stateless, depending on if a database is being used or not.
If a database is not used, then the Controller and Kong are deployed as colocated containers in the same pod and each controller configures the Kong container that it is running with.
For cases when a database is necessary, the Controllers can be deployed on multiple zones to provide redudancy. In such a case, a leader election process will elect one instance as a leader, which will manipulate Kong’s configuration.
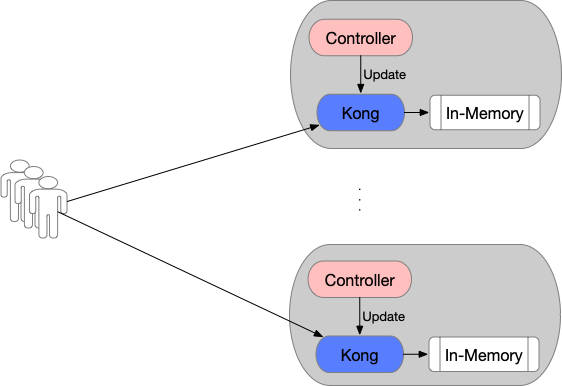
根据Kong-ingress-controller High-availability and Scaling给出的说明,可以得出高可用方案如下:
Kong DB-less Mode
在DB-less Mode下,各个Pod(Controller + Kong)之间数据独立(state-less),因此部署Kong-ingress-controller副本数(Replicas) > 1即可实现高可用,如下:
$ kubectl get deploy -nkong
NAME           READY   UP-TO-DATE   AVAILABLE   AGE
ingress-kong   1/1     1            1           8h
$ kubectl scale --replicas=2 deploy/ingress-kong -nkong
deployment.apps/ingress-kong scaled
$ kubectl get deploy -nkong
NAME           READY   UP-TO-DATE   AVAILABLE   AGE
ingress-kong   2/2     2            2           8h
$ kubectl get pods -nkong
NAME                            READY   STATUS    RESTARTS   AGE
ingress-kong-7875999c56-cbfzs   2/2     Running   1          8h
ingress-kong-7875999c56-r44bn   2/2     Running   1          34s
方案图如下:
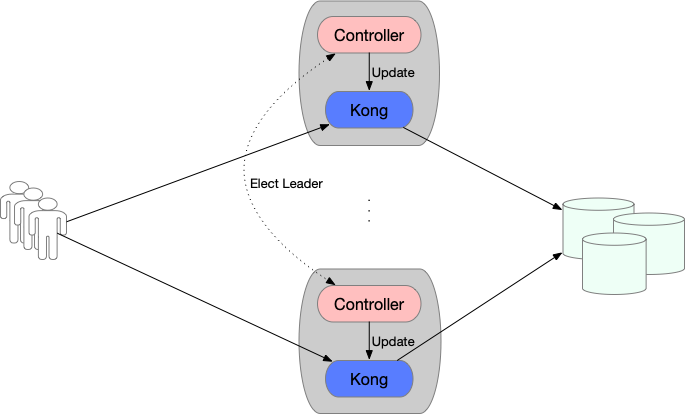
Kong DB Mode
在DB Mode下,Kong需要共享数据库。而Kong本身无状态,可以扩展;Controller实现了Leader选举机制保证同一时刻只有一个副本维护Kong配置(调用Kong Admin API),因此高可用方案如下:
- 1、Kong&Controller副本数(Replicas) > 1
- 2、DB高可用
方案图如下:
Conclusion
API Gateway是云原生应用中必不可少的组件,而Kong由于其具有的高性能和高可扩展性成为目前社区中最流行的API网关。本文从Kong API为切入点介绍了Kong的基本使用——Used As HTTP Proxy。而Kong虽然可以通过调用Admin API来完成代理行为,但是对于Kubernetes应用来说还是显得太过繁琐与笨重,Kong officials为了解决这个共性问题创建了Kong-ingress-controller项目。Kong-ingress-controller采用标准的Kubernetes Operator设计开发,以Kubernetes-Native方式使Kong代理Kubernetes服务,同时利用四种CRDs对功能进行扩展,以完成Kong原生所涵盖的所有特性,可以说是API Gateway Kubernetes-Native的最佳实践。最后本文给出了Kong-ingress-controller的高可用方案,这在企业生产环境中是非常重要且有必要的
Refs
- 选择Kong作为你的API网关
- High-availability and Scaling
- kong-ingress-controller实践
- kong proxy
- Kong Ingress Controller Design